
Overview
The TeamTime Job Attributes screen can be accessed from the Job Master File Timekeeping Info tab and the TeamTime Menu.
Use the TeamTime Job Attributes screen to set up how TeleTeam handles Jobs. The TeleTeam system uses the entries in this file when an employee calls in. The Export to TeamTime check box must be selected (located on the Job Master File (Timekeeping Info tab) screen) for the Job to be valid for TeleTeam.
The Caller ID Number list is used to identify valid call-in phone numbers for this Job. If the number identified by Caller ID does not match the valid numbers set up here, the call is considered a mismatch. You can use the same Caller ID phone number for multiple Jobs, but if the number is being used for more than one Job, the employee will need to enter their Job Number to avoid a caller id mismatch.
The Page If Caller ID Mismatch and Page For Absence selections will default from the TeamTime Defaults (Paging, VRU, and Adjustments tab) when setting up a new Job.
The TeamTime Job Attributes screen is also where you specify Jobs that will be using the Post Watch screen and whether or not to Enforce Punch Rejections.
The TeamTime Job Attributes screen has its own security group, JOB TeamTime Attributes.
The JOB TeamTime Job Attributes screen is part of the JOB ALL Security Group.
This screen has the Read-Only Feature. For more information see Learning about Read-Only Security.
Tip: For more information see Security Groups Overview and Security Groups By Module.
TeamTime Job Attributes
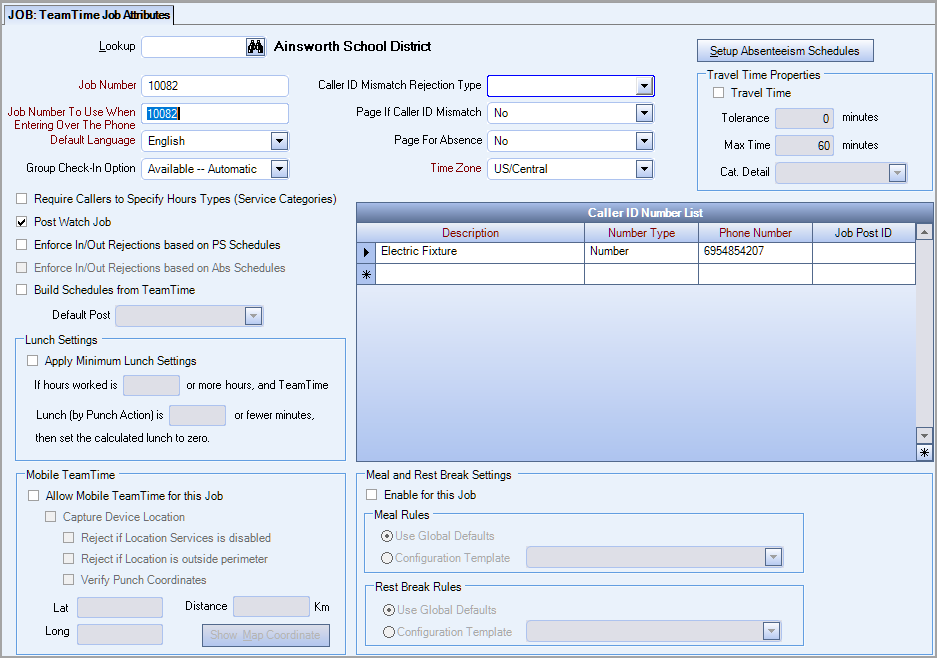
Key Functionality
Setup Absenteeism Schedules button
Click the Setup Absenteeism Schedules button to display the Absenteeism Notification Schedule screen.
Job #
Use the Job # field to view or select the Job Number. The corresponding Job Name displays at the top of the screen.
This field defaults to the currently selected Job # from the Job Master File (General tab) screen.
To select a different Job #, type the Job # in this field, or use Lookup to locate the Job #.
Job Number To Use When Entering It Over the Phone
Use the Job Number To Use When Entering It Over the Phone field to define the Job # for telephone entry. This field defaults to the Job #, which is acceptable in most cases. However, if you use Job Numbers that include alpha characters, you must assign a unique, numeric Job Number in this field.
Note: The maximum field length is determined on the TeamTime Defaults (Paging, VRU, and Adjustments tab) screen.
Default Language
Use the Default Language field to select the language for TeleTeam’s voice prompts when employees call in for this Job. The default value is set up on the TeamTime Defaults screen.
The drop-down selections are setup in the TeamTime: Language Settings screen.
Group Check-In Option
Use the Group Check-In Option field to select the type of group check-in allowed for this Job.
Select one of the following options:
Not Available
Select this option to disallow group check-ins.
Available Automatic
Select this option to allow an individual (who has been assigned group check-in capability in the Classifications screen) to automatically check-in a group of employees, instead of checking in each one individually. To do this, TeamTime looks at Permanent Timecards or schedules from Personnel Scheduling to determine which employees are assigned to work in the group.
Note: If TeamTime does not find any Permanent Timecards or schedules from Personnel Scheduling for this time period, the system changes to the Available Manual mode.
Available Manual
Select this option to allow an individual (who has been assigned group check-in capability in the Classifications screen) to manually check-in a group of employees, one at a time, by using Employee Numbers.
Caller ID Mismatch Rejection Type
Select the Caller ID Mismatch Rejection Type. The Caller ID Mismatch Rejection Type lets you group similar types of rejections for Post Watch and Absenteeism.
Type or select the Caller ID Mismatch Rejection Type.
To add a new Caller ID Mismatch Rejection Type, double-click in the Caller ID Mismatch Rejection Type field, or type a new Caller ID Mismatch Rejection Type, and press Enter. The CID Rejection Types add/edit list displays.
Page If Caller ID Mismatch
Indicate whether the system should send a page and/or voice message when the Phone Number for Caller ID does not match the phone numbers set up in Caller ID List.
This setting defaults from the TeamTime Defaults (Paging, VRU, and Adjustments tab) when adding a new Job.
Select one of the following options:
Yes - Select Yes to page the Job supervisor if the Phone Number for Caller ID does not match any of the valid numbers set up for this Job. The system also generates a voice mail message for the supervisors’ mailbox.
No - Select No to disregard Caller ID mismatches.
Message Only - Select Message Only to place a message in the Job supervisor's voice mail, but do NOT send a page when a Caller ID mismatch exists.
Page For Absence
Indicate whether to send a page and/or voice message to the supervisor of this Job if the minimum number of employees did not check in for a Job or the minimum number of people are not checked in during a Periodic Check Setting. This setting defaults from the TeamTime Defaults (Paging, VRU, and Adjustments tab) when adding a new Job.
Select one of the following options:
Yes - Select Yes to page the Job supervisor if the minimum number of employees has not checked in for the Job. The system also generates a voice mail message for the supervisor.
No - Select No to disregard all absences.
Message Only - Select Message Only to place a message in the Job supervisors’ voice mail but do NOT send a page when an employee is absent.
Time Zone
Select the applicable time zone for this Job location. The system uses the Time Zone to determine the difference in time zones between the Job location and the location of the TeamTime computer.
Travel Time Properties
The Travel Time Properties are used to define how the system should treat travel time for this Job. If the Job qualifies for travel time, select the Travel Time check box and complete the remaining fields in this area.
In addition to completing the Travel Time Properties area, you must also select a Classification on the Employee Master File (General tab) screen that includes the Travel Time option in order for an employee to receive travel time. The Travel Time Method is specified in the TeamTime Defaults (Defaults tab) screen.
The Travel Time feature is not applicable for Personnel Scheduling Jobs.
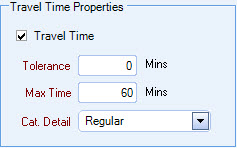
Travel Time
Select this check box if this Job can receive travel time. If you select the Travel Time option, you must enter the Travel Time Tolerance, Max Travel Time, and Cat Detail fields.
Travel Time Tolerance
Enter the time in minutes over the Max Travel Time that the system pays for. If there is no tolerance, enter 0.
Max Travel Time
Enter the maximum number of minutes the system pays for travel time. If the travel time exceeds this amount, the system will either disregard the travel time, flag the time for the exceptions report, or pay the travel time up to the Travel Time Tolerance amount.
Cat Detail
Select the Category Detail to identify the Hours Description to enter in the Timekeeping record for Travel Time.
Click the arrow for a list of valid Hours Descriptions for the selected job.
Note: The Category Detail and Hours Description fields are the same field. The field names are interchangeable in the system.
Require Callers to Specify Hours Types
Select the Require Callers to Specify Hours Types check box to require callers to enter an Hours Type when using the TeamTime system for this Job.
The Classification of the employee who is checking in must also have the Callers Can Enter Hours Types option selected on the Classification screen.
Post Watch Job
This field is enabled if "Allow Live Scheduling Lookups" is selected on the TeamTime Defaults (Paging, VRU, and Adjustments tab) screen.
Select this check box to include this Job in the Post Watch screen and it also allows the VRU to determine if PS Schedules should be updated on the fly.
For new records this check box is not selected.
If this check box was previously selected and then you cleared the "Allow Live Scheduling Lookups" on the TeamTime Defaults (VRU tab) screen, this check box will remain selected, but will be disabled. This feature prevents you from having to set up each job again in the event that someone accidentally clears the "Allow Live Scheduling Lookups" check box.
Enforce In/Out Rejections based on PS Schedules
This field is enabled if Allow Live Scheduling Lookups is selected on the Paging, VRU and Adjustment tab of the TeamTime Defaults window.
Select this check box to enforce Punch Rejections, check ins and check outs that are outside of the Tolerance set up in PS: Schedules.
This check box is not automatically selected for new records.
Calls are not "rejected" based on Caller ID mismatch, they are logged and allowed to clock in/out, but the call is not "rejected".
Calls are "rejected" based on Valid Match Criteria settings in the TeamTime Defaults (PS Auto Overwrite tab) and Tolerance settings (Adjustments and Tolerance tab) screen. Calls are also "rejected" if the employee who calls in is not scheduled.
If this check box is selected, you cannot have the Build Schedules from TeamTime check box selected.
Enforce In/Out Rejections based on Abs Schedules
This field works if Allow Punch Rejection based on Abs Schedules is selected on the Paging, VRU and Adjustment tab of the TeamTime Defaults window.
Select this check box to turn on the ability (at the job level) to reject check ins/outs that are outside of the tolerance setup in the Absenteeism Notification Schedule window.
This check box is not automatically selected for new records.
If this check box is selected, you cannot have the Post Watch Job, Build Schedules from TeamTime or Enforce In/Out Rejections based on PS Schedules check boxes selected.
Build Schedules from TeamTime
Selecting this check box will allow users to build PS Schedules from TeamTime activity for a specific Job on the upload from TeamTime to WinTeam. In other words, TeamTime shift records will be inserted into new shifts in PS Schedules for the Job when TeamTime uploads to WinTeam.
This check box is NOT selected by default on new records. If this check box is selected, you cannot have the Enforce In/Out Rejections based on PS Schedules selected.
When punching in, employees must enter both a Job and a Post. The Post must be entered regardless of the setting "Can Enter Post ID" on the Classification screen. All existing PS Schedule records will be ignored on the upload from TeamTime to WinTeam. So if an Employee is already scheduled to work and also has a record that will be uploaded for building a schedule, existing records will not be updated with new times; an entirely new record will be created for that Employee's time in order to build the schedule.
During the Upload from TT to WT, the entire shift will update, not individual punches. The system will use the first row in the working week for the Scheduled Day, for that Post (or Post Detail ID), and insert a new shift off that first row. The employee will be assigned into that inserted shift, changing the InTime, OutTime, Lunch and Hours.
See WinTeam Setup: Building Schedules from TeamTime and Building Schedules from TeamTime for more information.
Default Post
This field is enabled when the Build Schedules from TeamTime check box is selected. When schedules are built from TeamTime, the Post selected here will be the Post that Employees working the Job will be assigned to IF they do not have Can Enter Job Post enabled in their Employee Classification.
For Employees that do have Can Enter Job Post enabled, a list of Posts will be presented for the Employee to select from. (The list will be based on the Posts that have a working week scheduled for the current date according to the Job time, not server time. PS Schedules should be rolled over as appropriate.)
If a Job does not have a Default Post assigned and Build Schedules from TeamTime is selected, a lists of Posts will always be presented for the Employee to select a Post.
Lunch Settings
Apply Minimum Lunch Settings
The Apply Minimum Lunch Settings area is used to set up adjustments for lunch breaks. Based on the settings entered, the lunch will not be deducted from the calculated time uploaded to WinTeam. The clock-in and out times stored in TeamTime do not change.
Select the Apply Minimum Lunch Settings check box, and then type values for minimum hours worked and maximum hours taken for lunch.

In the example shown, employees that work at least 8 hours at this Job but take 15 minutes or less for lunch will have eight hours of calculated time uploaded to WinTeam.
When using Lunch Break Adjustments with Post-Arrival and Pre-Departure Adjustments at the same time, the Lunch Break Adjustment is determined by the actual time the employee clocks in and out. Post-Arrival and Pre-Departure Adjustments do not affect Lunch Break Adjustments.
Note: It is not recommended that you use Automatic Lunch Parameters with Minimum Lunch Settings (Lunch Break Adjustments). If you do, Minimum Lunch Settings will always override Automatic Lunch Parameters.
Mobile TeamTime
Note: Some Classification settings will not work with employees using mobile TeamTime. For example, the mobile application does not prompt employees to enter their Hours Type or Job Post even if the Classification is set up with these settings.
Select the Allow Mobile TeamTime for this Job check box to enable employees to check in and out via a mobile device.
Companies can also select to capture the Device Location and reject punches. You can choose to reject punches if you have disabled Locations Services on your device or reject punches if the Device Location is outside a specific perimeter.
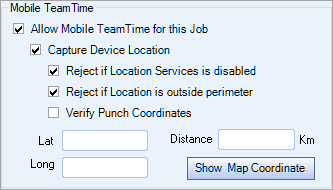
When you select to reject punches if the Device Location is outside a specific perimeter you can edit the Location Settings and define the perimeter of acceptable punches. The latitude and longitude information is entered by default based on the job address (if an address exists).
When you click the Show Map Coordinate button, the GPS settings screen displays and you can set the fence however you like. To set the fence, position your mouse on the edge of the perimeter until you see the "drag me" text, then drag to the appropriate perimeter size.
Tip: Increase the screen size view to easily display the "drag me" text.
Note: If you are unable to display the "drag me" text to position the edge of the perimeter, it might be helpful to add teamehub.com to your compatibility view settings in your browser's tools menu.
To edit the coordinates, copy and paste from the GPS settings screen.
If a fence is set and you then try to change the job address, you will also need to change the Mobile TeamTime setting to update the Location Settings.
Note: There is no way to save or retain the coordinates if you change them on the GPS settings window.
Select the Verify Punch Coordinates check box to turn on the tracking of the Employee Location Tracking Action Item for the selected job. To enable this check box you need to have Allow Mobile TeamTime for this Job, Capture Device Location and Reject if Location is outside perimeter fields selected. Also, you need the Lat, Long and Distance fields populated for this feature to work.
Caller ID Number List grid
Use the Caller ID Number List grid to identify the valid call-in phone numbers for this Job.
If the number identified by Caller ID does not match the valid numbers set up here, the call is considered a mismatch.
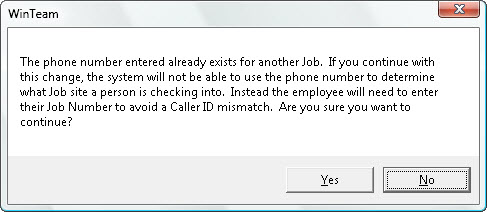
You can use the same Caller ID phone number for multiple Jobs, but if the number is being used for more than one Job, the employee will need to enter their Job Number to avoid a caller id mismatch.
If you enter a phone number that is already being used by another Job, the following message displays:
Description
Use the Description field to identify this Caller ID Phone Number. The description can be the name/number of the Job, the actual floor and location of the phone from which this number is calling, or any other text that identifies the Caller ID Phone Number.
Number Type
Use the Caller ID Number Type to select either Number or Mask.
Select Number if call-ins will originate from a single phone number.
Select Mask if call-ins may originate from a sequential bank of numbers.
Phone Number
Enter a valid call-in number for this Job site. You can use a phone number for multiple Jobs, but if the number is being used for more than one Job, the employee will need to enter their Job Number to avoid a caller id mismatch.
Do not enter dashes or parenthesis.
If the Number Type is Number, enter the area code and phone number.
If the Number Type is Mask, enter the area code, fixed portion of the phone number, and mask character(s). The mask character is an asterisk (*). Use this in place of the last numbers of the Phone Number to represent any number from 0-9. For example, if the bank of numbers is (555)555-1111, (555)555-1112, and (555)555-1113, enter 555 555 111*.
Note: The mask can be a maximum of 3 characters, for example 555 555 1***. Remember however, that the greater the number of mask characters, the longer the system takes to confirm the Caller ID.
Job Post ID
Select a post to assign to this phone number.
Meal and Rest Break Settings
These setting are used in the Meal and Rest Breaks functionality which allows you to track and report meal and rest break information to so you can know that your employees are taking the appropriate breaks, helping you prevent violations and mitigate compliance risks.