
Overview
The Contact Migration Utility can be accessed from the System - Tools Menu.
With the update to WinTeam 4.5 , we have removed all of the old contact fields that were in place with the 4.x version and requiring that companies now use the Contacts area for setting up a Customer contact. As we convert other modules with Contact fields, similar changes will be done.
With the update to WinTeam 4.6, we removed the old contact fields that were in the Vendor Master File and Prospect Master File.
With the update to WinTeam 5.1, we removed the old contact fields that were in the Job Master File.
Use this tool after you have updated to WinTeam 4.5.xxx for Customers
Use this tool after you have update to WinTeam 4.6 for Vendors and Prospects.
Use this tool after you have updated to WinTeam 5.1 for Jobs.
The fields that are removed during the update are circled below:
Note: The Contact Information is essentially the same whether you are migrating Customers, Prospects, Vendors, or Jobs.
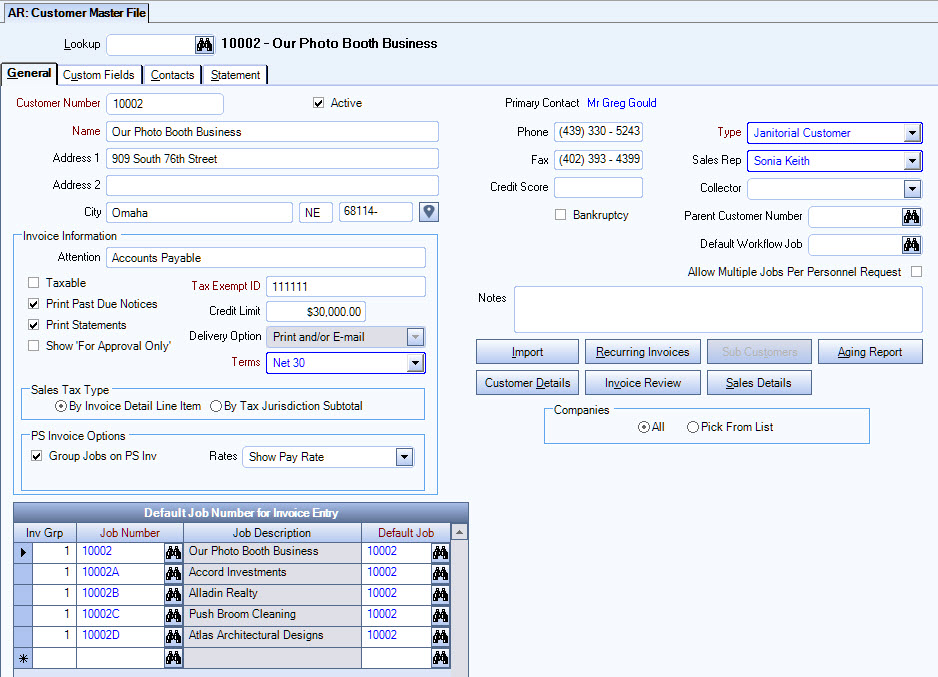
After the migration, these will be replaced with the name of the Primary Contact that you set up for each Customer using the Customer Master File (Contact tab) screen.
The new Customer Master File (Contact tab) will be used to indicate all the Contacts used by the Customer. A Primary Contact can then be assigned to each Customer.

The Primary Contact will display on the Customer Master File (General tab) screen.
You can double-click on the Primary Contact Name to open the Contact record.
About the Contact Migration Utility
The Contact Migration Utility will filter for those Customers, Prospects, and Vendors who do not have a Primary Contact currently set up, but who do have old Contact information stored in the old Master File record.
These are the records that you should be concerned with since you will no longer be able to see the old fields on the new Master File screen.
To open the Customer Migration Utility screen
From the System - Tools Menu, click Contact Migration Utility.
When you first access this screen, the system displays all Customers who do not have a Primary Contact currently set up, but who do have old Contact information stored in the old Customer Master File record.
If there is a Contact currently set up that matches the first and last name of the old Contact information, it will display in the "Use This Contact" column.
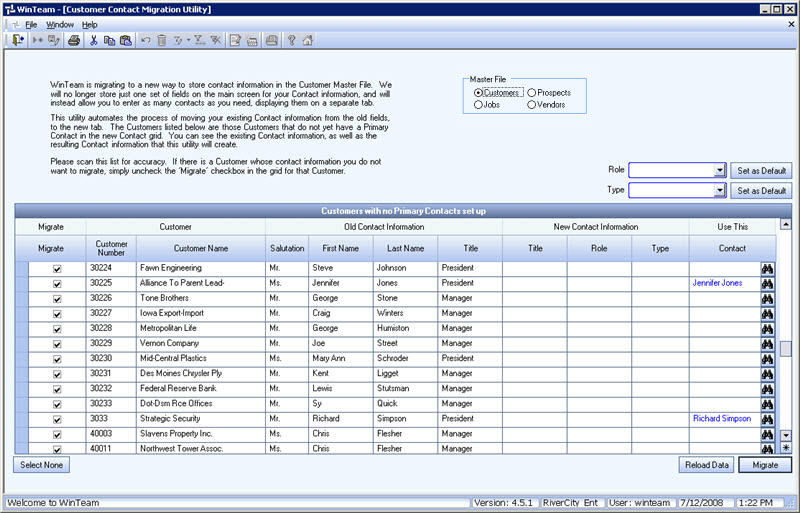
The Migrate check box is selected by default. This indicates the records you want to migrate to the new Contact set up screen.
Once the migration occurs, the selected records will have a new Contact record created.
To Prepare for the migration
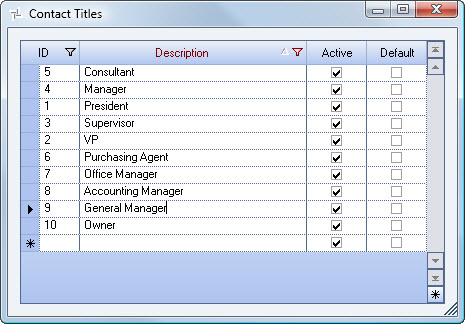
Review Titles
- Review the Old Contact Information Titles.
- Write these down.
This is a good time to clean up and standardize your Titles.
You may have some contacts listed with a title of A/P Clerk, Accounts Payable, A/P, Pres, President, etc. Now you can define a consistent list of Titles and exclude the unnecessary duplication.
Set up Titles
Set up all of the Titles you will need in the Contacts screen that you just identified.
- Go to Customer Master File and view a current record.
- Go to the Contacts tab, and click the Contact Setup button.
- Double-click in the Title field to open the Contact Titles add/edit list.
- Add your Titles.
The next time you go into the Contact Migration tool, all of the new Titles you have set up will be available.
This field is not required in the Contact Setup screen, but it is recommended you use it to help identify the positions of your Contacts.
Review for missing First and Last Name
In order for a contact of a customer to be created, both the First and Last Names of the records need to be filled in.
Because of this you will want to review the following:
- Sort the First Name column in ascending order to see if there are any contacts that do not have a First Name. Those records without a First Name will NOT migrate to the new Contact screen.
- Sort the Last Name column in ascending order to see if there are any contacts that do not have a Last Name. Those records without a Last Name will NOT migrate to the new Contact screen.
You might want to jot these down to see if you can determine the correct First and Last Name so that you can enter it before running the migration tool. Otherwise the customer record will have to be unchecked and it will NOT be included in the migration.
Decide on Roles
Decide on the Roles that you want to have available for Contact setup. Roles are uniquely identified by each company for your particular usages. A Role should not be confused with the Title of a contact, but rather it is more the “purpose” of a contact.
For example, for our Customer Master File Contacts, the Primary Contact that you have identified is more than likely going to be the one that you would contact for billing and accounts receivable type questions. In that sense, you may want to just set up a Role called “Billing Contact” or “Collections”. As the Contacts area evolves in WinTeam, the Contact Role will be used in differing areas to identify the Role of the contact record you want included on a particular report, for instance.
You may decide at this time to just set up one Role for now and use that one role for the primary customer contact.
You can double-click in the Role field to display the Contact Roles add/edit list.
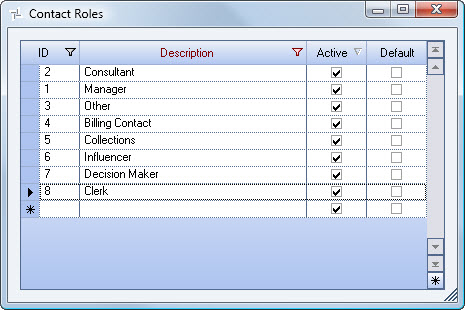
If you want to use the same Role for all records in the grid, select the Role in the list (on the Contact Migration Utility screen), and then click Set as Default.

The Role you selected will populate each Role field in the grid.
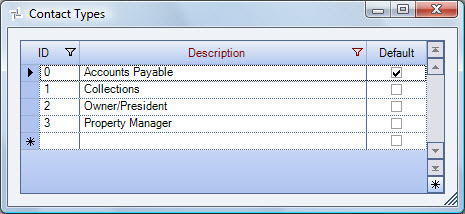
Decide on Contact Types
Decide on the Contact Types that you want to have available for Contact setup. At a later date, a report will be available for contacts that will allow you to run a contact listing for a particular type of contact. At this time, the Type type field is just a way for you to categorize your contacts in your database.
Since this is a required field in the Contact Setup, you will want to set up at least one and call it something like “Default” or “None”. When you go to migrate the Customer Contact information, you will have to select a Type for each record or select a type and default that type on all records.
If you want to use the same Type for all records in the grid, select the Type in the list (on the Contact Migration Utility screen), and then click Set as Default.
The Type you selected will populate each Type field in the grid.
Using the Contact Migration Utility
Now you should have all information needed to create your Contact records using the Contact Migration tool.
- Open the Contact Migration Utility screen.
The screen will open with all Customer records that had old contact information and no Primary Contact selected. - Select a Role for each Customer row.
If you want to default a Role into each Customer row, use the Role field (above the grid) and select a Role from the list. Then click Set as Default to have that Role inserted into the New Contact Information Role field.
- Select a Type for each Customer row. This is a required field.
If you want to default a Type into each Customer row, use the Type field (above the grid) and select a Type from the list. Then click Set as Default to have that Type inserted into the New Contact Information Role field.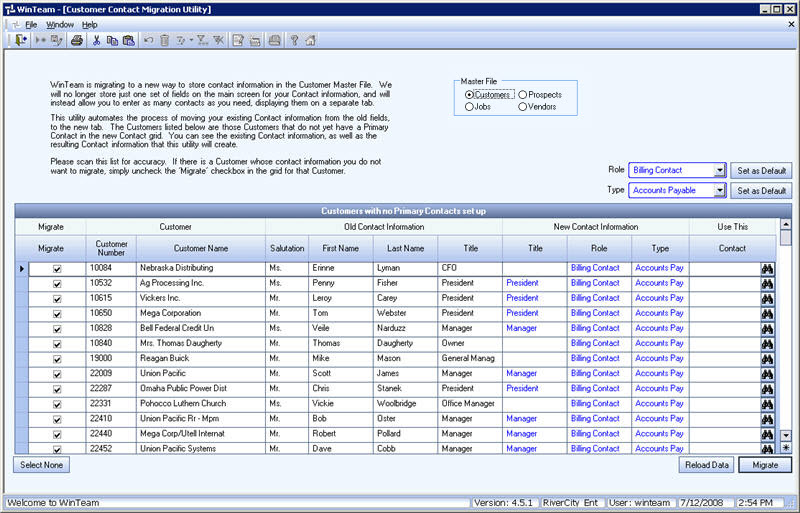
- Select a Title for each Customer row.
There is no default setting for this. If you want the Contact to be set up with a Title, you will need to go through each record and select from the list the Title you want to save with the Contact record. This is not a required field during Contact set up, but just mentioned here in case you want to put in a Title for each contact listed. - There is one other field available on each of the rows called Use This Contact. Some clients could already be using the new Customer Contact setup screen and just haven’t indicated a Primary contact for the customer. If there happened to be a contact already set up with the same first and last name of the old contact information, the system will display this contact in this field since it is likely that would be the contact record you would want to choose for the Primary Contact. You can always choose from the list if there are contact records set up that you want to use as the primary contact for a particular customer.
- Uncheck the Migrate check box for those records that have missing first or last names. If you leave the Migrate check box selected on records that are missing this information, the migration process will stop.
- If you want to create (migrate) just one customer’s contact information for a test, you could click the Select None button (or press ALT + S) at the bottom to clear (uncheck) all records and then select the one (or the records) you want to create.
- Click the Migrate button (or press ALT + M).
During the process, the data is validated ensuring there is a first and last name entered one each Customer Contact row that is marked to Migrate (the Migrate check box is selected), and then will create a Contact record for the rows that you selected to Migrate.
If there are records found without a first or last name, the migration stops, and no records will migrate. You will receive this message: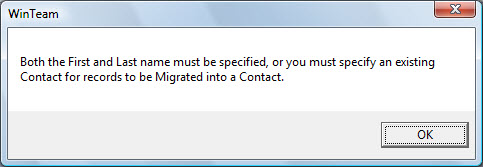
If there are records found without a Type, you will receive this message:
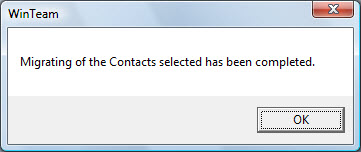
- You will receive a message when the process is complete.
Reload button
Click the Reload button (or press ALT + R) to reset all fields in the grid to its original state before you starting making changes.
When you click Reload, you will receive this message:
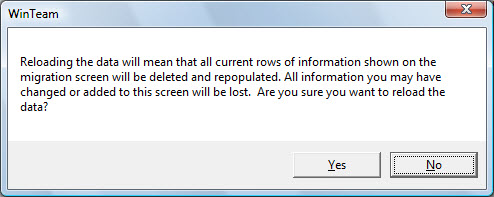
If you click No, your data remain as is.
If you click Yes, all field return to their original state before you started making changes.