
Overview
The Employee Termination report lists all terminations that have occurred at each service location for the criteria and time period specified. You may group by Job or Employee Number. You can sort By Job or Employee, Number or Name.
The Employee Turnover Report contains a turnover percentage to help you measure turnover. Turnover percentage is calculated by dividing the total number of terminated employees by the total number of active employees.
Example: There are 416 active employees and 10 terminated employees. So the turnover percentage equals 2.4% because 10/416=0.024.
You can specify which Status Reasons are used in the employee termination calculation on the Status Reasons add/edit list. This is a great report to use if you want to view a list of employees who are eligible for Rehire. You can further filter the list by using Inactive Reasons.
You may filter, group, and print the report by tiers, allowing for total customization of the report. Use the Tier Templates to set up and save templates. This makes it easy to create a specific report each time you need one without recreating the criteria. See Using Tier Templates for more information.
The Turnover Report (Detail Format) includes a line item for all statuses within the reporting period. It includes the Inactive record and the Active record. However, it does not include multiple Active records (just the most current Active record within the reporting period).

The HR Report Employee Termination screen has its own Security Group, HR Report Employee Termination.
The HR Report Employee Termination screen is part of the HR Reports All Employees Security Group.
Tip: For more information see Security Groups Overview and Security Groups By Module.

Related Information
Identify Users and Frequency of the Employee Turnover Report
Go to Human Resource Reports menu
Key Functionality
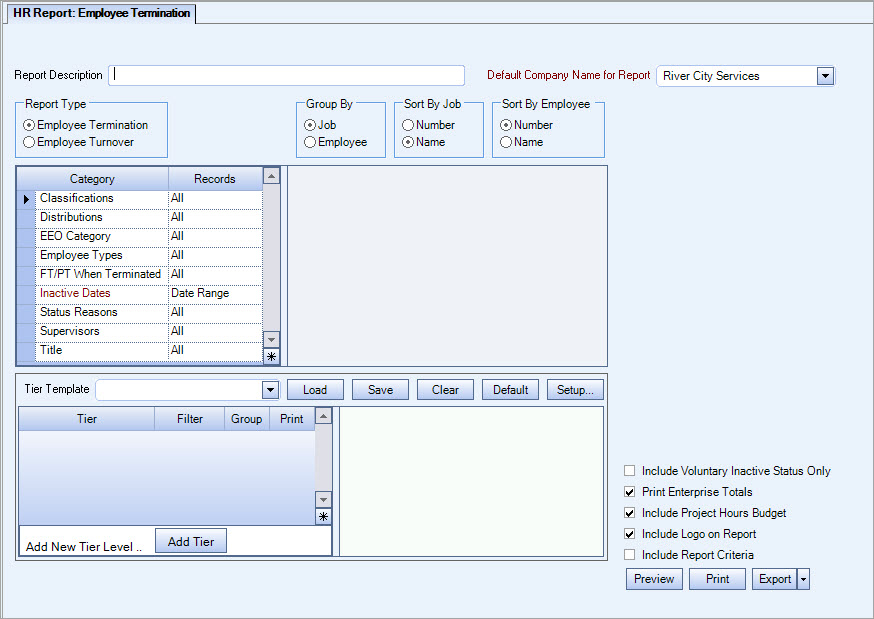
Type a description to name the report. This description prints above the Report Title.
The Default Company Name for Report is populated from the Company Setup screen. The list contains all companies for which you have security permissions to view. If you have permission for only one company, that will be the only one displayed in the list. If you have permissions to multiple companies, the list will display those companies PLUS the default reporting company.
When discernible, WinTeam will print the appropriate company name and logo on each page; otherwise the Default Company Name will print. That is, if a Company level is included in the tiered section and is displayed in the tiered information at the bottom of the page, then that company's Report Name and Logo (if selected) prints on that page.
If there is not a Company identified in the tier area of the page, then the Default Company Name for Reports is used. The default Company Name and Logo is also used for the Total Enterprise report. For more information see Learning about WinTeam Reports.
Select either Employee Termination or Employee Turnover.
Click Employee Termination to include employee termination information on the report.
Click Employee Turnover to include employee turnover information on the report. If this is selected the Report Format options display and the Hire Date Cut-Off field.
For more information, see Identifying Users and Frequency of the Employee Turnover Report.
Use the Report Format option to choose the level of detail for the report.
The Report Format displays only for the Employee Turnover Report.
Group By
Select to Group By Job or Employee.
Employee is the default selection.
Sort By Job
Select to sort the report data by Job Number or Job Name.
Sort By Employee
Select to sort the report data by Employee Number or Employee Name.
Hire Date Cut Off
The Hire Date Cut Off field is available when the selected Report Type is Employee Turnover.
Use the Hire Date Cut Off to enter the cut off date for the report, or use the Date Control to select the date.
Note: When running the Employee Turnover Report, the Hire Date Cut Off date is used to find all employees who were Active on this date. This determines the number of Active Employees listed on the report. This means someone may have terminated after the hire date cut off but since they were active as of the Hire Date Cut Off, they are considered Active for the report.
Example: If you are running the report with a Hire Date Cut Off of 12/31/10, but the employee terminated on 1/10/11, they are considered Active on this report.
Category/Records
Classifications
Use the Classifications category to select the Classifications to include on the report.
Select All to include all Classifications.
Select Pick to define specific Classifications for the report. When you select Pick, the Classifications list displays. Select the check box next to each Classification to include on the report.
Distributions
Use the Distributions category to select the Distribution to include.
Select All to include all Distribution types.
Select Pick to define specific Distribution to include. When you select Pick, the Check Distributions add edit list displays. Select the check box next to each Check Distribution to include.
EEO Category
Use the EEO Category to select records based on the predefined EEO Category List.
Select All to include all records regardless of the EEO Category.
Select Pick to define specific EEO Categories/ When you select Pick, the predefined EEO Category list displays. Select the check box next to each EEO Category to include.
Employee Types
Use the Employee Types category to select the Employee Types to include.
Select All to include all Employee Types.
Select Pick to define specific Employee Types. When you select Pick, the Employee Types list displays. Select the check box next to each Employee Type to include.
FT/PT when Terminated
Use the FT/PT when Terminated category to include all FT/PT status indicators on the report.
Select All to include Full Time, Part Time, Subcontractor, and Other/Casual statuses on the report.
Select Pick to select a specific FT/PT status as of that termination date, and then filter accordingly.
WinTeam will look at the date range and run for that specific status.
FT/PT
Use the FT/PT category to include all FT/PT status indicators on the report.
Select All to include Full Time, Part Time, Subcontractor, and Other/Casual statuses on the report.
Select Pick to select a specific FT/PT status and then filter accordingly.
WinTeam will look at the date range and run for that specific status.
Note: The EmployeeTerminationReport | ShowCustomFTPTFilter custom setting must be set to use this filter. See the list of custom settings for Human Resources for more information.
Inactive Dates
Use the Inactive Dates category to select the dates to include on the report.
Type the beginning date in the From field and the ending date in the To field.
When running the Employee Termination Report, the Inactive Date range determines the number of Total Termed Employees. If the employee was made inactive (or put on Leave of Absence) between this date range, they are considered part of the Inactive count.
Status Reasons
Use the Status Reasons category to select the Status Reasons to include on the report.
Select All to include all reasons on the report.
Select Pick to define specific reasons for the report. When you select Pick, the Status Reasons list displays. Select the check box next to each reason to include on the report.
Supervisors
Use the Supervisors category to filter the report by Supervisors.
Select All to include all Supervisors.
Select Pick to select the Supervisor(s) to include.
Note: The Supervisors' category is filtering using the Employees' Supervisor, not the Jobs' Supervisor. You can limit the employees using the Category/Records, then use the Tiered information to limit the Jobs.
Titles
Use the Titles category to filter the records based on Employee Titles.
Select All to include all records regardless of Titles.
Select Pick to define specific Titles for the report. When you select Pick, the Titles list displays. Select the check box next to each Title to include on the report.
Include Voluntary Inactive Status Only
This option is available when the Type of report is Employee Termination.
Select this check box to only include employees with a Voluntary Inactive Status Reason in the Employee Master File.
Use the Tier Template to define and save customized settings for a report. To use an existing template, select the template from the list and click Load.
To create a new template, you can load an existing template, make the necessary modifications, click Save, and define a new template name in the Save As dialog box. Alternatively, you can start with a blank template by clicking the Clear button.
To modify an existing template, load the template, make the necessary modifications, and then click Save. The name of the existing template display in the Save As dialog box. Click OK.
For more information see Using Tier Templates and Using Tier Parameters.
The Print Company Totals check box is available to users who have only one company, and may be selected to print company totals on the report.
The Print Enterprise Totals check box is available to users who have more than one company, and may be selected to print enterprise totals on the report. This check box is selected by default.
If this is not selected, the report prints only the tiered reports that are marked for printing.
This option is available when the Type of Report is Employee Termination.
Select the Include Project Hours Budget check box to print the project hours budget on the report.
Select this check box to print the company logo on the report. It is selected or cleared by default based on the option selected in SYS:Defaults. However, you can modify the setting on each report.
Select this check box to include a list of the report options selected for the report. The Report Criteria page includes any ranges specified and each Category/Record selection made for the report. This check box is cleared selected by default.
Preview
Click the Preview button (or use the shortcut key, ALT + V) to view the report before printing.
Click the Print button (or press ALT + P) to send the report to your default printer.
Export
Click the Export button (or press ALT + X) to export the report to a specified format. Reports may be exported to Adobe Acrobat (PDF), Excel, Comma-Separated Values (CSV), Grid View and E-mail (available for premise-based clients only).
If an employee is terminated 3 times during a year, and you are running the report that spans all three term dates, each termination record will display on the report once within that date range.
The Turnover Report (Detail Format) includes a line item for all statuses within the reporting period. It includes the Inactive record and the Active record. However, it does not include multiple Active records (just the most current Active record for the Primary Job within the reporting period).