
Overview
The Benefit Insurance/Other Analysis report options screen will help you to produce several different types of useful analysis reports:
- The Vendor Billing Report displays the Employer premiums per Vendor. This will assist you in reconciling the monthly billings.
- The Other Deduction Report compares Employee Cost information from the Benefits By Employee screen with the Employee Master File Other Compensation and Other Deductions screen.
- The Cost Report allows you to review the Employee Cost information from the Benefits By Employee screen and can help identify those employees who may soon be reaching an age where their insurance premiums will change. This report also includes Total Premium which is the sum of EE Cost and ER Cost. Includes subtotals and Grand Totals for EE Cost, ER Cost, and Total Premium columns on the report.
- The Employer Insurance Cost Allocation Report is available if the 'Employer Insurance by Job' check box is selected in the PAY: Defaults (Misc. tab). The Employer Insurance Cost Allocation can be used to view historical Employee and Employer Insurance Costs based on paychecks that have already been processed. For each insurance benefit type (medical plans, dental, life ins., etc), the report includes employee name, plan option, employee cost (from employee deduction), employer cost, and total cost. It displays historical results based off of paycheck processing (what was actually deducted from the Employee paycheck, and the Employer cost that was allocated during that paycheck run), for specific check dates.
You can filter the report using tier which makes it easy to create a specific report each time you need one without recreating the criteria. See Using Tier Templates and Using Tier Parameters for more information.
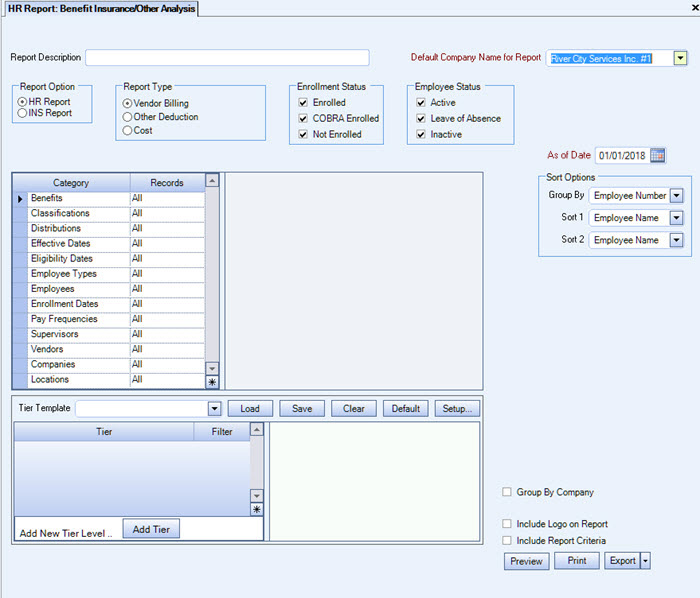
You can access the Benefit Insurance/Other Analysis report from WinTeam's Human Resources or Insurance Benefits modules.
Key Functionality
Type a description to name the report. This description prints above the Report Title.
Available for Clients using the Multi-Company feature. The Default Company Name for Report is populated from the Company Setup screen. The list contains all companies you have permission to access.
- If the User has permission to only one company, then just that one company will display in the list.
- If the User has permissions to more than one company, the list will contain all companies the User has rights to PLUS the default reporting company.
When the Group By Company option is selected, the default company prints on the Grand Total Page and the Report Criteria page. All other pages print the applicable company name. When the Group By Company option is NOT selected, the default company prints on every page of the report.
For more information see Learning about WinTeam Reports.
You can run this report using either the benefit information in the HR or INS modules.
Select the Report Type.
- Click Vendor Billing to generate a report that shows the Employer premium per Vendor.
- Click Other Deduction to generate a report that compares the Employee Cost information from the Benefits By Employee screen to the Employee Master File Other Compensations and Deductions screen.
- Click Cost to generate a report that shows the Employee Cost, Employer Premium, and Total Cost.
- Click Employer Insur Cost Allocation to generate a historical report of Employee and Employer Insurance Costs based on paychecks that have already been processed. This option displays when the Employer Insurance by Job check box is selected on the PAY: Defaults Misc. tab.
Use the Enrollment Status option to select the employees to include on the report based on their enrollment status for benefits.
- Select Enrolled to include employees who are enrolled for benefits on the report.
- Select COBRA Enrolled to include employees who are COBRA enrolled on the report.
- Select Not Enrolled to include employees who are not enrolled for benefits on the report.
Use the Employees Status option to filter the report data by employee status.
- Select Active to include only active employees on the report.
- Select Leave of Absence to include only employees who are on leave of absence on the report. If this options is selected, you may group the report by Inactive Reason.
- Select Inactive to include only inactive employees on the report.
When the HR Report Option and Employer Insur Cost Allocation Report Type are selected, the Check Dates options display and are required in order to run the report. WinTeam will look back at Payroll Check Deductions for the Employee that are tied to the applicable benefits and total up the deduction amounts and use that total.
Enter the date for which you want to run the report. This can be a future date, which is useful because you can include employees in the report who have enrolled in benefits, but whose benefits are not active as of the current date.
Example: If you run the report in December, and enter an As of Date of January 1, the report will include the employees who have enrolled in benefits that begin in the next year.
Use the Sort Options to sort the list of benefit hours included on the report.
Select Group By to specify the first area to group by. The default is Employee Number.
Select a Sort 1 parameter to sort the records that have been grouped. The default is Employee Name.
Select a Sort 2 parameter to further sort the records.
Include Employees with option is available when the Report Type is Other Deduction.
- Select Deducts Matching the EE Cost to include employees that have other deduction records that match the Employee Cost on the Benefits By Employee screen.
- Select Deducts Not Matching the EE Cost to exclude employees with deductions matching the EE Cost.
Benefits
Use the Benefits category to select the Benefits to include on the report.
Select All to include all Benefits on the report.
Select Pick to define specific Benefits for the report. When you select Pick, the Benefits list displays. Select the check box next to each Benefit to include on the report.
Birth Dates
Use the Birth Dates category to select the employees to include on the report based on Birth Dates.
Select All to include all employees, regardless of the Birth Date.
Select Date Range to define a range of Birth Dates for the report. When you select Date Range, the range fields display. Type the beginning date in the From field and the ending date in the To field.
This Category is available when the Report Type is Cost.
Classifications
Use the Classifications category to select the Classifications to include on the report.
Select All to include all Classifications.
Select Pick to define specific Classifications for the report. When you select Pick, the Classifications list displays. Select the check box next to each Classification to include on the report.
Distributions
Use the Distributions category to select the Distribution to include.
Select All to include all Distribution types.
Select Pick to define specific Distribution to include. When you select Pick, the Check Distributions add edit list displays. Select the check box next to each Check Distribution to include.
Effective Dates
Use the Effective Dates category to select the dates to include on the report.
Select All to include all Effective Dates.
Select Date Range to define a range of Effective Dates for the report. When you select Date Range, the range fields display. Type the beginning date in the From field and the ending date in the To field.
Eligibility Dates
Use the Eligibility Dates category to select the dates to include on the report.
Select All to include all Eligibility Dates.
Select Date Range to define a range of Eligibility Dates for the report. When you select Date Range, the range fields display. Type the beginning date in the From field and the ending date in the To field.
Employee Types
Use the Employee Types category to select the Employee Types to include.
Select All to include all Employee Types.
Select Pick to define specific Employee Types. When you select Pick, the Employee Types list displays. Select the check box next to each Employee Type to include.
Employees
Use the Employees category to select the Employees to include on the report.
Select All to include all Employees on the report.
Select Range to define a range of Employees for the report. Type the beginning Employee Number in the From field and the ending Employee Number in the To field.
Select Create to define your own list of Employees. When you select Create, a small grid displays to the right. Enter the Employee Numbers you want to include in the list, or use the Lookup to locate the Employee Numbers.
Select Exclude to identify records that should not be included. When you select Exclude, a small grid displays to the right. Enter the Employee Numbers you want to exclude in the list, or use the Lookup to locate the Employee Numbers.
Enrollment Dates
Use the Enrollment Dates category to select the dates to include on the report.
Select All to include all Enrollment Dates.
Select Date Range to define a range of Enrollment Dates for the report. When you select Date Range, the range fields display. Type the beginning date in the From field and the ending date in the To field.
Pay Frequencies
Select the Pay Frequencies to include on the report.
If using the Pick from List option, the system determines the check records to include by the Employee's current Pay Frequency set up in the Employee Master File. The only exception is when running the report for Format: Report and Report Type: Detail by Check.
Note: When running the report for Format: Report and Report Type: Detail by Check and limiting the pay frequency using the Pay Frequencies category, the system will look at the pay frequency of the batch instead of the Employee's current pay frequency. All Batch Types have a Pay Frequency defined except for Void and Tax Adjustment Batches. For Void and Tax Adjustment batches, the current pay frequency of the Employee (as indicated in the Employee Master File) will determine whether the void or tax adjustment record is included.
Primary Jobs
Use Primary Jobs to filter the report by Primary Jobs.
Select All to include all Primary Jobs.
Select Range to define a range of Primary Jobs for the report. When you select Range, the range fields display. Type the beginning Primary Job Number in the From field and the ending Primary Job Number in the To field.
Select Pick to select the Primary Job(s) to include.
Select Create to define your own list of records. When you select Create, a small grid displays to the right. Enter the records you want to include in the list, or use the Lookup to locate the records.
Select Exclude to identify records that should not be included. When you select Exclude, a small grid displays to the right. Enter the records you want to exclude in the list, or use the Lookup to locate the records.
Supervisors
Use the Supervisors category to filter the report by Supervisors.
Select All to include all Supervisors.
Select Pick to select the Supervisor(s) to include.
Vendors
Use the Vendors category to select the Vendors to include on the report. (On the HR: and INS: Benefit Insurance/Other Analysis Reports, this Category is available when the Report Type is Vendor Billing.)
Select All to include all Vendors.
Select Range to define a range of Vendors for the report. When you select Range, the range fields display. Type the beginning Vendor Number in the From field and the ending Vendor Number in the to field, or use the Lookup to locate the Vendor Number.
Select Pick to define specific Vendors for the report. When you select Pick, the Vendor list displays. Select the check box next to each Vendor to include on the report.
Select Create to define your own list of Vendors. When you select Create, a small grid displays to the right. Enter the Vendor Numbers you want to include in the list, or use the Lookup to locate the Vendor Numbers.
Select Exclude to identify records that should not be included. When you select Exclude, a small grid displays to the right. Enter the Vendor Numbers you want to exclude in the list, or use the Lookup to locate the Vendor Numbers.
Companies
The Company Pick option filters for AR Invoice and Payment records. The Companies category is available for Clients using the Multi-Company feature.
Select the Companies to include on the report.
Select All to include all companies on the report.
Select Pick to define specific Companies for the report. When you select Pick, the Companies list displays. Select the check box next to each Company to include on the report.
Note: When running reports using the Company Category/Record Pick and the company name exceeds the maximum number of characters, WinTeam will truncate the name.
Locations
The Locations category is available for Clients using the Multi-Location feature.
Use the Locations category to select the Locations to include on the report.
Select All to include all Locations on the report.
Select Pick to define specific Locations for the report. When you select Pick, the Locations list displays. Select the check box next to each Location to include on the report.
Use the Tier Template to define and save customized settings for a report. To use an existing template, select the template from the list and click Load.
To create a new template, you can load an existing template, make the necessary modifications, click Save, and define a new template name in the Save As dialog box. Alternatively, you can start with a blank template by clicking the Clear button.
To modify an existing template, load the template, make the necessary modifications, and then click Save. The name of the existing template display in the Save As dialog box. Click OK.
For more information see Using Tier Templates and Using Tier Parameters.
This option is available to users who have more than one company, but is not selected by default. If selected, the default company prints on the Grand Total Page and the Report Criteria page. All other pages print the applicable company name. If not selected, the default company prints on every page of the report.
Select this check box to print the company logo on the report. It is selected or cleared by default based on the option selected in SYS:Defaults. However, you can modify the setting on each report.
Select this check box to include a list of the report options selected for the report. The Report Criteria page includes any ranges specified and each Category/Record selection made for the report. This check box is cleared selected by default.
Preview
Click the Preview button (or use the shortcut key, ALT + V) to view the report before printing.
Click the Print button (or press ALT + P) to send the report to your default printer.
Export
Click the Export button (or press ALT + X) to export the report to a specified format. Reports may be exported to Adobe Acrobat (PDF), Excel, Comma-Separated Values (CSV), Grid View and E-mail (available for premise-based clients only).
Related Information
The HR Report Benefit Insurance/Other Analysis screen has its own Security Group, HR Report Benefit Insurance/Other Analysis. The HR Report Benefit Insurance/Other Analysis screen is part of the HR Reports All Benefits Security Group