
Overview
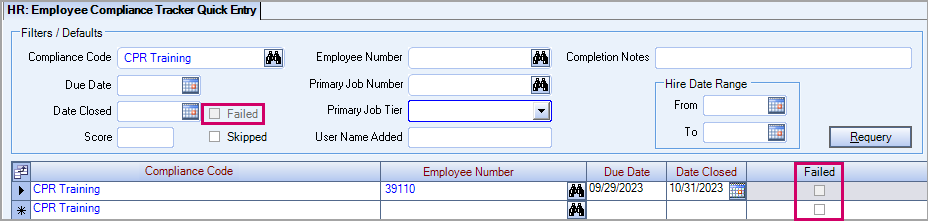
The Employee Compliance Tracker Quick Entry window is accessed from the Compliance Tracker By Employee window. Use it to quickly enter Compliance information for multiple employees. It also allows you to filter for Compliance Codes and also set defaults for completing Compliance information.

Note: The Compliance Tracker Quick Entry feature can only be used for non-license compliance codes (codes on the Compliance Codes tab). It cannot be used for License/Expiration Codes.
- If a compliance code is not configured to support Failed or Skipped options, then the Failed option in unavailable in the grid.
- When the Advanced Security option is selected on the Compliance Tracking Codes window, users cannot edit or delete compliance code history in an employee's record.
When you filter items, you selectively choose what items will appear in the grid. You can filter by Compliance Code, Due Date, Date Completed, Score, Primary Job Number, Employee Number, Primary Job Tier, User Name Added, and Hire Date Range.
Defaults can be set to make data entry easier. It is a good idea to include as much information that is the same for all employees that completed the Compliance item. You can set the Compliance Code, Due Date, Date Completed, Skipped, Score, Completion Notes, and Employee Number. With most of the default information added, you can then quickly enter the Employees who completed the item. When Default information is entered, that related field in the grid is removed from the Tab stop. This is much faster than entering information in each employee record.
Security
The HR:Employee Compliance Tracker Quick Entry screen has its own Security Group, HR Employee Compliance Tracker Quick Entry.
The HR Employee Compliance Tracker Quick Entry screen is part of the HR ALL Security Group.
Tip: For more information see Security Groups Overview and Security Groups By Module.
This screen has the Read-Only Feature. For more information see Learning about Read-Only Security.
Filters / Defaults
The Filters / Defaults area are used for filtering data, and in some cases, for defaulting the fields in the grid for new records.
You must enter at least one criteria (Compliance Code, Employee, Job, Job Tier, Date Completed, or Due Date).
Compliance Code
The Compliance Code field can be used as a Filter and as a Default.
Enter the Compliance Code ID in this field, or use the Lookup feature to locate the Compliance Code.
Once tab off the Compliance Code field, the Compliance Code Description displays in the grid.
Due Date
The Due Date field can be used as a Filter and as a Default.
Enter a Due Date, or use the Date Control to select a date.
Date Completed
The Date Completed field can be used as a Filter and as a Default.
Enter a Date Completed, or use the Date Control to select a date.
Score
The Score field can be used as a Filter and as a Default.
The Score field is used to enter a score associated with this Compliance Code, if applicable. The Score value will display up to a 5-digit value. You can enter a score (number) up to 99999.
Skipped
The Skipped check box can be used as a Default only.
Select the Skipped check box to mark Compliance Code as skipped.
Employee Number
The Employee Number field can be used as a Filter and as a Default.
Enter the Employee Number in this field, or use the Lookup feature to locate the Employee.
The system will check the User's Pay Security Basic Read Level and include in the grid only those employee's with a security level that is equal to or less than the User.
The Default information will populate in the grid (Compliance Code, Due Date, Date Completed, Skipped, Score, Completion Notes, and Employee Number) if the User's Pay Basic Write Security Level equals or is greater than the Employee Security Level.
If you enter an Employee Number that you do not have security to read, you will receive this message:
If you enter an Employee Number that you have rights to Read, but not to Write, no Default information displays in the grid.
You cannot enter or edit information for an Employee that you do not have permission to use.
Primary Job Number
The Primary Job Number field can be used as a Filter only.
Enter the Primary Job Number in this field, or use the Lookup feature to locate the Job.
Primary Job Tier
The Primary Job Tier field can be used as a Filter only.
Select the Primary Job Tier from the list, or double-click in the Primary Job Tier field to create a new Tier Template.
The tier template does NOT look at dated tiers.
User Name Added
The User Name Added field can be used as a Filter only.
Enter a User Name to filter by the User who added the Compliance information.
Completion Notes
The Completion Notes field can be used as a Default only.
To open the field in Zoom mode you can
- Double-click in the field OR
- Press Shift + F2 OR
- Right-click, then select Zoom (only for multi-line text boxes, not in a grid)
From the Zoom screen you can view or edit the entire Notes area. For more information see Using the Zoom Feature.
Hire Date Range
The Hire Date Range fields can be used as a Filter only.
It filters based on the Employees Current Hire Date.
Enter a From and To date, or use the Date Control to select a date.
Requery button
Once you click Requery, the system reads the Filters (Compliance Code, Due Date, Date Completed, Score, Primary Job Number, Employee Number, Primary Job Tier, User Name Added, and Hire Date Range) to determine the records that display in the grid. You must enter at least one criteria before requerying. If at least one is not entered, you will receive this message:

The records are filtered based on the Employee Basic Read Security.
The information that defaults to the grid is based on Employee Basic Write Security.
If you click on a row in the grid, and you do not have Basic Write permissions for that employee, the columns are locked for that row.
Grid
The grid displays records using the Filters criteria that the User has permission to view.
If you enter Default information (Compliance Code, Due Date, Date Completed, Skipped, Score, Completion Notes, and Employee Number) in the Filters/Defaults area AND you have Basic Write permissions for the employee, the grid will populate with the Default information.
For more information see Using Compliance Track Quick Entry.
Employee Number
Enter the Employee Number in this field, or use the Lookup feature to locate the Employee.
The system will check the User's Pay Security Basic Write Level to determine if User has permissions to "Write" to the record.
If you enter an Employee Number that you do not have security to write, you will receive this message:
You cannot enter or edit information for an Employee that you do not have Basic Write permission to use.
Primary Job
This field is read-only.
The Primary Job comes from the Employee Master File.
Due Date
Use the Due Date field to view or enter the Due Date for this Compliance Code.
Date Completed
Use the Date Completed field to view or enter the date the employee completed this Compliance Code.
Skipped
Use the Skipped check box to mark Compliance Codes that this employee will not complete.
Score
Use the Score field to enter a score associated with this completed Compliance Code, if applicable. The Score value will display up to a 5-digit value.
Image File Path
Use the Image File Path to specify the file path of the scanned image of a document associated with the Compliance Code (license, test, etc).
Notes
Enter any notes applicable to the Compliance Code completion.
Information entered in the Completion Notes field defaults here.
To open the field in Zoom mode you can
- Double-click in the field OR
- Press Shift + F2 OR
- Right-click, then select Zoom (only for multi-line text boxes, not in a grid)
From the Zoom screen you can view or edit the entire Notes area. For more information see Using the Zoom Feature.
System Notes
This is a read-only field.
The System Notes provides meaningful information as to what was changed, by whom, and when.
To open the field in Zoom mode you can
- Double-click in the field OR
- Press Shift + F2 OR
- Right-click, then select Zoom (only for multi-line text boxes, not in a grid)
From the Zoom screen you can view or edit the entire Notes area. For more information see Using the Zoom Feature.
Hover over the Change Information icon to see User Added, Date Added, User Changed and Date Changed information. WinTeam records the logon name of the user entering or changing this record. The Date Added is the original date this record was entered into the system. The Date Changed is the date the record was last changed. Right-click on the Change Info icon to filter for records added or changed by a specific user or date.
When you hover over the User Changed or Date Changed filters, you can:
- Filter By Selection - Filters for all records that match your current records field value.
- Filter by Exclusion - Excludes from your filter all records that match your current records field value.
- Filter For - Filters based on the text/value you enter.
- Sort Ascending - If you already have a filter applied, the Sort Ascending command is available. Also used to include all records in the filter and sort in ascending order based on the current records field value.
- Sort Descending - If you already have a filter applied, the Sort Descending command is available. Also used to include all records in the filter and sort in descending order based on the current records field value.