
Overview
The Deduction Creator is used to create deduction records and add them to the Employee Master File Deduction record (or Paycheck Batch). The Deduction Creator automates the process of creating deduction records. The Deduction Creator creates the deduction record in the Employee Master File in order to include the deduction in the next check run or the records can be included in a Paycheck Batch. You may wish to review the Pay Comp/Deduct Creator topic.
Tip: Use this import file to create your excel Deduction file with multiple codes.
Security
The PAY Comp/Deduct Creator has its own Security Group, PAY Comp/Deduct Creator.
The PAY Comp/Deduct Creator Screen is part of the PAY ALL Security Group.
Company and Location security are implemented for Enterprise and SaaS Customers. For more information see Learning about Location Security.
Specifications for the .xls file
Deduction records are created in an .xls file.
File must be saved as a .XLS file.
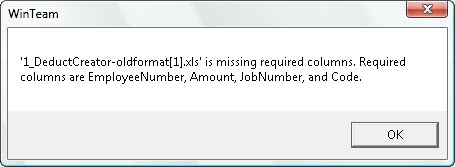
The columns of information MUST be in this order, and it must contain these column headers (exactly as listed): EmployeeNumber, Amount, JobNumber, Code.
Do not do any extra formatting to the file (centering, etc.).
The tab name must remain "Sheet1". If a tab is renamed to something other than "Sheet1", you will receive this error:

To use the Pay Comp/Ded Creator to create deduction records in the Employee Master File
From the Payroll menu, click Comp/Deduct Creator.
The Pay Comp/Deduct Creator screen displays.
Under Import Type, select Deduction. Once you select Deduction, the Destination will change to Employee Master File.
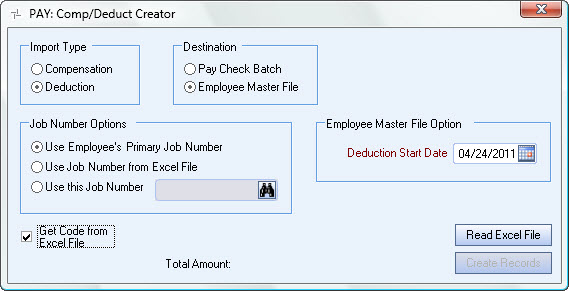
Select where you want the system to pull the Job Number from. Your options are:
Use Employee's Primary Job Number
This is the default selection. Use this option to use the employee's Primary Job Number from the Employee Master File.
Use Job Number from Excel File
Use this option to use the Job Number from the Excel file.
Use this Job Number
Use this option to select a specific Job Number.
Enter the starting date of the deduction. Although you may enter a date that is 30 days earlier or 30 days greater than the current system date, you will receive a warning message. This field is required. The date entered here will appear in the Employee Master File Other Deduction record.
Select the Get Code from Excel File to pull the Deduction Code from the excel file. Use only Active Codes that have a $ Amount as the Method, have a Basis of One Time, and include a GL Number for the Employee Set Up screen.
Click the Read Excel File button. Locate the excel file you want to import.
Click Read Excel File. The system then attempts to validate the data.
If the expected column headings (EmployeeNumber, Amount, JobNumber*, and Code) are not present, you will receive an error message similar to this:
The system then attempts to validate the data.
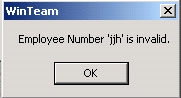
To validate the Employee Numbers, the system checks to make sure the employee numbers exist in WinTeam, If invalid Employee Numbers are present, you will receive a message similar to this:
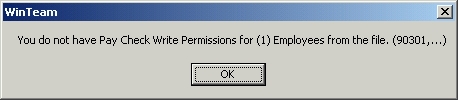
To validate the pay security level, the system checks to make sure that the User who is logged in has a Paycheck Write security level equal to or greater than the employee's having deductions taken. If there is a conflict, you will see a message similar to this:
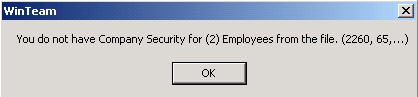
To validate the Location and Company security, the system checks to make sure that the current user has the proper Location and Company permissions. If not, a message similar to this displays:
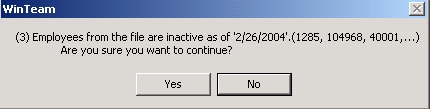
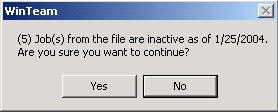
The system also validates that the employee is active using the Deduction Start Date. If inactive employees exist, you may select Yes to continue.
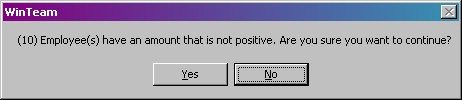
To validate the Amount, the system checks to make sure that the amount is a positive number. If a negative number is used, you will receive a warning message, but are allowed to continue. This allows you to correct the file if needed. Both the positive and negative amounts are included when processing the value for the total amount.
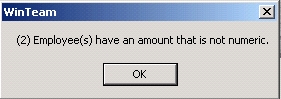
The amount field must contain numeric data or you will receive a message similar to this:
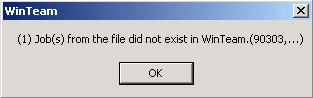
Job Numbers are validated only if Use Job Number from Excel file is selected as the Job Number option. To validate the Job Numbers, the system verifies that the Job Numbers exist in the WinTeam database. If Job Numbers are invalid, you will see a message similar to this:
The system also validates that the Job Number is active. There are no date validations here.
To validate the Deduction Codes, the system checks to make sure that the Codes are valid and have a $ Amount as the method, have a Basis of One Time, and include a valid GL Number under the Defaults for the Employee Setup screen.
Once the validations occur, the Create Records button is enabled and the Total Amount field displays a value for all amounts to be processed.
Click Create Records to create deduction records for the employees. The Deduction Code is included for the next paycheck wizard batch created where the Deduction Start Date entered is within that date range created.
Run the Payroll Wizard.
Print checks.
Verifying Deductions
Deductions can be verified by going to each Employee Master File, and then clicking on the Other Comps/Deds button.