
The Daily Itinerary Report is designed for those companies who do route work. This report can take the place of a work ticket. It contains all of the information that is contained on the work ticket in a condensed form. All of the work tickets for a route may be printed on one or two pieces of paper instead of each schedule printed individually. The Schedules will be listed on the report in Start Time order.
To run the Daily itinerary, you can access it from different areas. You can run it from the reports section by clicking on Reports then Daily Itinerary. You have many ways to run this report based on the options given.
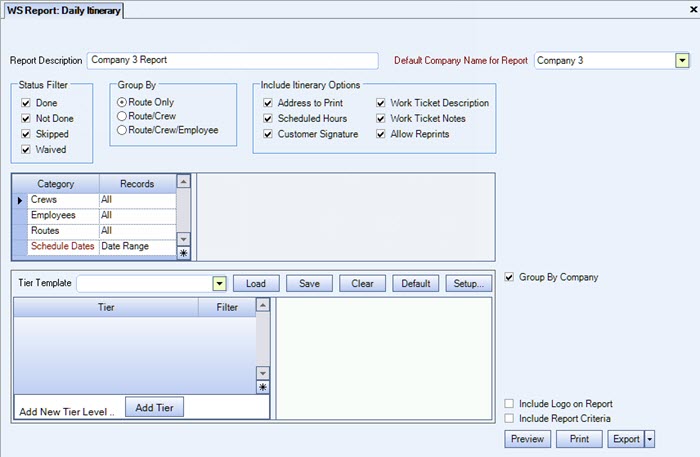
The Group by section allows for the Itinerary report to be broken down to the employee level. If the Route Only option is selected, the system will print an individual schedule for each assigned route. There is no break down by crew or employee. If the Route/Crew option is selected, you can use the Crews category to select all crews or specific crews. The system will print each Crew for a Route on a separate itinerary.
If the Route/Crew/Employee option is selected, you can use the Crews category to allow the selection of all crews or specific crews. The second category to choose is the Employees. All employees, selected employees, or a range of employees may be selected through this option. An individual itinerary will be printed for each employee based on the Crew and Route assigned.
The Routes category allows for the selection of All Routes established or specific Routes to include in the report.
The Jobs options are used to select all or specific jobs based on the selection criteria entered. If the Pick From List option is selected, a new option box will be displayed allowing for the selection of those Jobs to include in the report. If the Range option is selected, the system will display a second option box allowing for the beginning and ending range of Job Numbers to include in the report.
The Itinerary Options allow for the specification of what information should be included in the Itinerary. All of the options are checked initially. If any of these are unchecked, the related information will not appear on the report.
The last option on the screen is the Show Logo on Report. If a company logo has been entered, it will be printed at the top of each page of the report. If it is unchecked, the logo will not be printed.
Once you have entered the selection criteria, click on the Preview button at the bottom of the selection screen. The report will preview on the screen. If you have a default printer selected, you may print this report from the preview screen by clicking on the Print icon at the top of the screen.
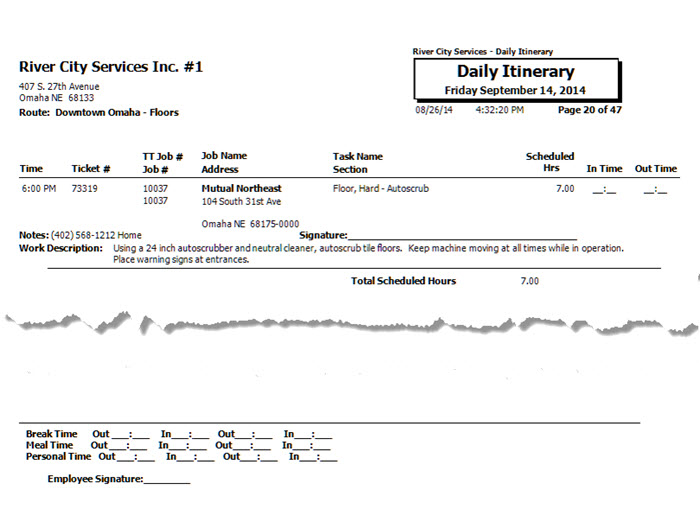
Note: In the Job Default file, there is an entry section called Message to Print in the Bottom of the Page of the Work Schedule Itinerary Document. The information entered in this area will be printed in the space at the bottom of every page of the Itinerary report.