Overview
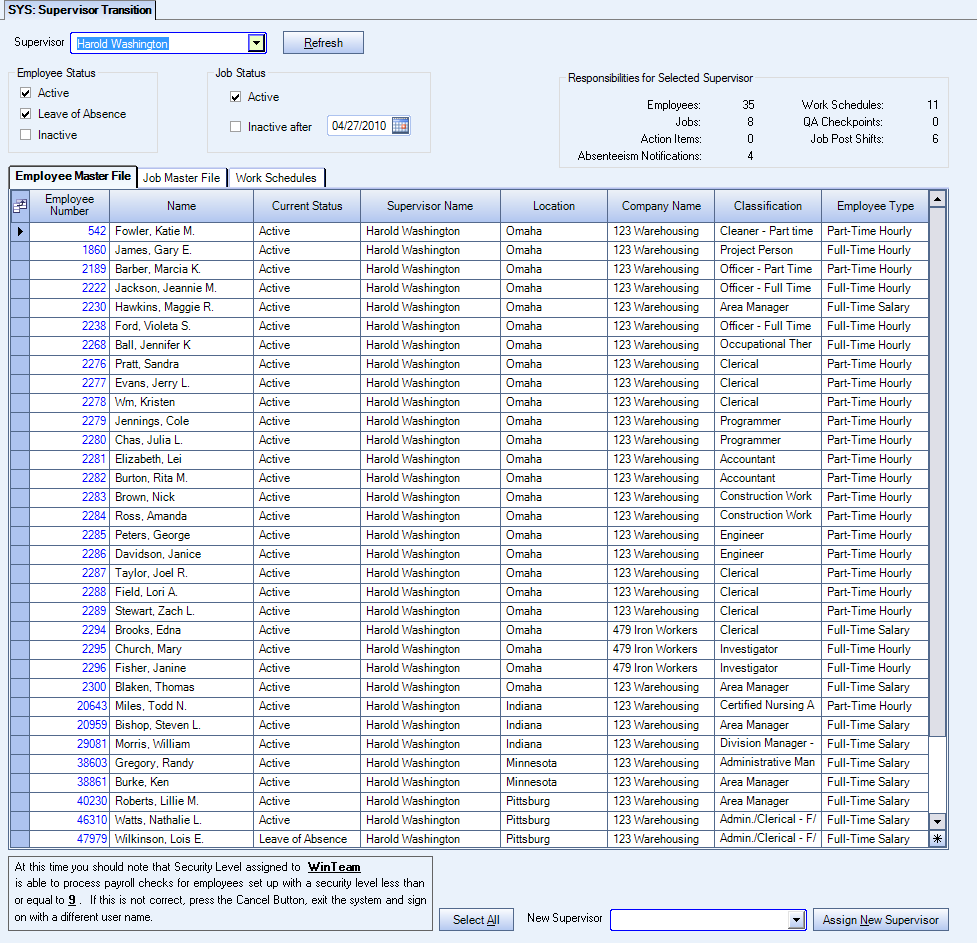
Use the Supervisor Transition window to complete a bulk update of the Supervisor field on the Employee Master File, Job Master File, or Work Schedules. This window helps you automatically change the supervisor value when it effects more than one employee, job, or work schedule. Using this window saves you time, as you no longer have to make manual changes one employee or job at a time. The Supervisor Transition window is accessed from the Tools menu in the System module.
Note: If you have this supervisor set up in Absenteeism Notification Schedules or in Post Setup, remember to update those fields.

Key Functionality
The Responsibilities for Selected Supervisor section displays an overview of how many employees, jobs, action items, work schedules, work tickets and QA checkpoints are related to the selected supervisor.
- Employees - Number of employees who have the Supervisor listed on the Employee Master File.
- Jobs - Number of jobs who have the Supervisor listed on the Job Master File.
- Action Items - Number of Action Items with a Job that has the supervisor in its Job Master File. Action Items with a status of Done will not be counted in this value. You could see inactive jobs included in this value.
- Absenteeism Notifications - Number of records on the Absenteeism Notification Schedule screen for the jobs assigned to the supervisor. The absenteeism notification records are updated when the job is selected for supervisor transition on the Job Master File tab. After the transition, the Supervisor field on the Absenteeism Notification records is cleared and notifications are sent to all employees configured as TeamTime and eHub supervisors in the Supervisor Details grid. If the notification should only go to a specific supervisor(s), then you must manually update the record after the transition is complete.
- Work Schedules - Number of Work Schedules with the Ticket Supervisor listed on the General tab of the Schedules screen. Only active schedules are counted in this value.
- QA Checkpoints - Number of Checkpoints associated to a job that has the supervisor in its Job Master File. Only active checkpoints are counted in this value.
- Job Post Shifts - Number of Shift Detail records on the Post Setup screen for the jobs assigned to the supervisor. The shift detail records are updated when the job is selected for supervisor transition on the Job Master File tab. This updates all Active, Inactive, and Purged records. After the transition, the Supervisor field on the Shift Detail records is cleared and notifications are sent to all employees configured as TeamTime and eHub supervisors in the Supervisor Details grid. If the notification should only go to a specific supervisor(s), then you must manually update the record after the transition is complete.
Clicking the Refresh button refreshes the Responsibilities for Selected Supervisor section, the Employee Master File grid and the Job Master File grid. Use this button after you change the Employee Status or Job Status selections.
- Select the supervisor name that you need to change from the Supervisor drop-down. The Employee Master File grid will load the list of employees with that supervisor.
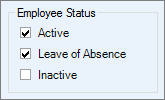
- Ensure the Employee Status options are selected appropriately. If you change these options use the Refresh button to update the screen.
- Use the selector area of the row to select the employees you want to update. Use Shift+Click to select adjacent employees and use Ctrl+Click to select nonadjacent employees. Click the Select All button located at the bottom of the screen to select all records in the grid.
- At the bottom of the screen select the new supervisor's name from the New Supervisor drop-down.
- Click the Assign New Supervisor button. A confirmation window displays.
- Select Yes to process the change. Each updated record is grayed out and locked in the grid, and the Supervisor Name field is updated.


- Select the supervisor name that you need to change from the Supervisor drop-down.
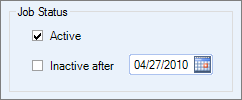
- Ensure the Job Status options are selected appropriately. If you change these options use the Refresh button to update the screen.
- Select the Job Master File tab to display the job grid.
- Use the selector area of the row to select the jobs you want to update. Use Shift+Click to select adjacent jobs and use Ctrl+Click to select nonadjacent jobs. Click the Select All button located at the bottom of the screen to select all records in the grid.
- At the bottom of the screen select the new supervisor's name from the New Supervisor drop-down.
- Click the Assign New Supervisor button. A confirmation window displays.
- Select Yes to process the change. Each updated record is grayed out and locked in the grid, and the Supervisor Name field is updated.


- Select the supervisor name that you need to change from the Supervisor drop-down.
- Select the Work Schedules tab to display the work schedules grid.
- Use the selector area of the row to select the work schedules you want to update. Use Shift+Click to select adjacent jobs and use Ctrl+Click to select nonadjacent jobs. Click the Select All button located at the bottom of the screen to select all records in the grid.
- At the bottom of the screen select the new supervisor's name from the New Supervisor drop-down.
- Click the Assign New Supervisor button. A confirmation window displays.
- Select Yes to process the change. Each updated record is grayed out and locked in the grid, and the Supervisor Name field is updated.

Security
You must have the SYS Supervisor Transition screen selected in the SYS ALL security group for access to this screen.
Note: Your User Security settings may limit the returned employee and job records. This includes the Employee Security Level and locations and/or company security limitations.
