Overview
The messaging service feature allows eHub supervisors and WinTeam users to send messages to employees via eHub Mobile, or SMS text messages. Messages can be sent for various reasons, some examples are to announce open enrollment, safety or complaint notifications, reminders, how to handle specific weather conditions, or even to say "happy holidays".
eHub supervisors can send messages to employees through eHub Mobile or messages can be created and sent through WinTeam by a WinTeam user. Messages display within the message inbox in eHub Mobile or if sent via SMS text they display in the device's messaging app. Notifications for messages are sent as SMS text messages or as a push notification through eHub Mobile. Employees that have not enabled the SMS text option, or push notifications in eHub Mobile, will still be able to view messages via the message inbox in eHub Mobile. This mobile application is available for iOS and Android.
The messaging service is available to clients who have access to eHub.
Key Functionality
Set up
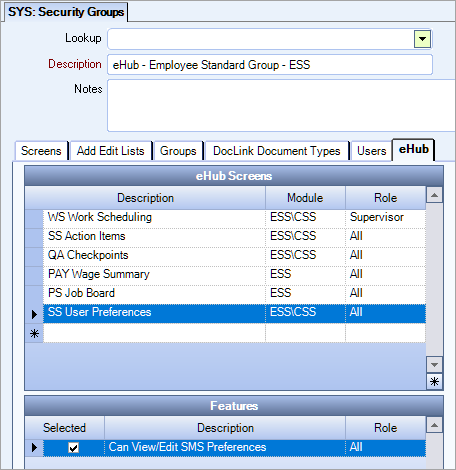
To opt in for SMS notifications, the eHub Security permission SS User Preferences must be included in the eHub role assigned to the employees and the Can View/Edit SMS Preferences feature check box must be selected.
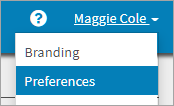
Employees need to select their text messaging preferences in eHub Web. Navigate to preferences, by clicking their user name in the top right of the eHub screen.
Select the button for the phone number you would like to enable text messaging for.

When the confirmation message displays, click to start the opt in process. The preferences screen shows a disable button and a pending indicator next to the phone number you have opted in. This indicates the opt in process has been started but is still in progress. A text message is sent to the phone number enabled, with instructions on how to proceed with the opt in process.
- In the System module, open the User Security window (located in the Security group).
- Use the Lookup field to display the employee you want to add this feature to.
- On the General tab, select the Can Send Messages check box.
Selecting this check box, enables the messaging service icon in the top WinTeam toolbar and allows the WinTeam user to send messages to an employee or group of employees.
Note: There must be an employee number assigned to the WinTeam user before the Can Send Messages check box is available.
- Open the Messaging Service window by clicking the messaging service icon on the WinTeam toolbar.
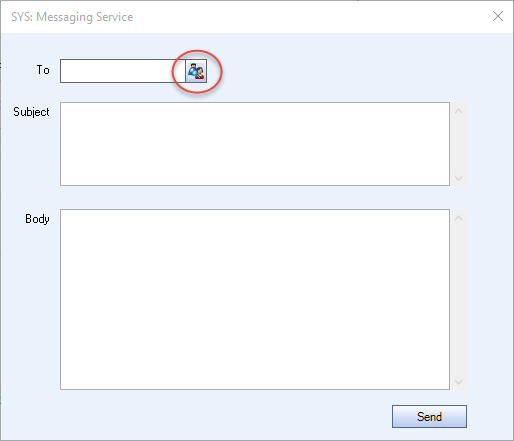
- Open the Messaging Service Add Recipients window by clicking the Select Recipients icon on the To field.
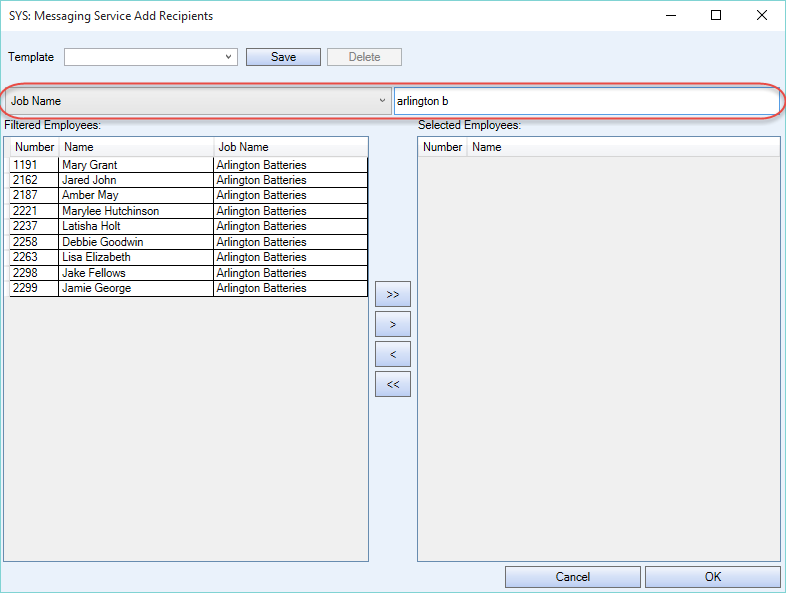
- This window allows you to filter and select the employee(s) that you want to send the message to. To filter, select the drop down and choose the appropriate filter option.
- Employee Number
- Employee Name
- Employee Classification
- Employee Type
- Job Name (employee's primary job)
- Company Name (for a multi-company database)
- Location
- Supervisor Name
- Only Supervisors
- PS Job
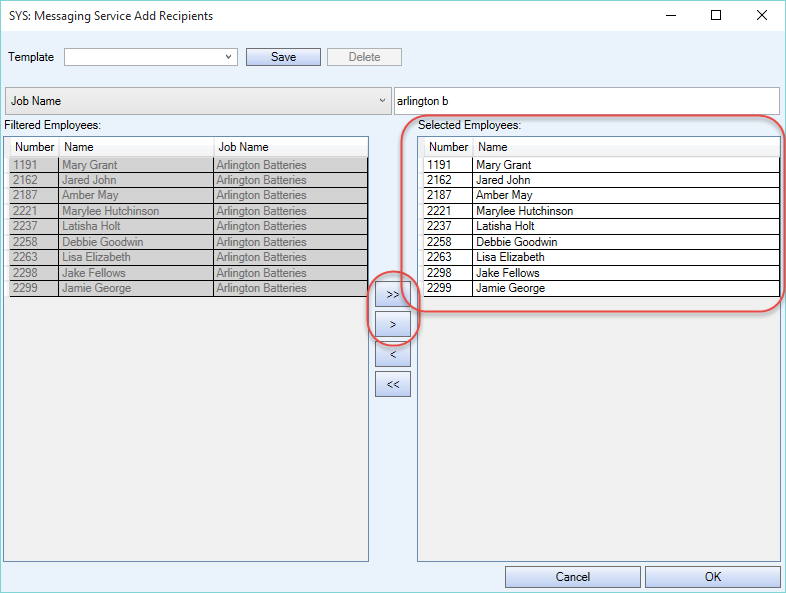
- Select the employee(s) you want to send a message to. The Ctrl and Shift keys allow you to select multiple employees at the same time. Use the single arrow to move the highlighted employees to the Selected Employees section. The double arrow moves all displayed employees in the section to the Selected Employees box.
- A template option is available to group employees you frequently send messages to. Once you have a list of employees in the Selected Employees box, click the Save button, enter a name to identify the employee group and click the OK button. Once the template is setup, you can use it to quickly send a message to the same group of employees.
- Once you have the employees you want to send the message to listed in the Selected Employees box, click the OK button. The number of recipients display in the To field.
- To see which employees have SMS enabled or have registered for push notifications, double click in the To field to display the Employee Information window.
- In the Messaging Service window, complete the Subject and Body text boxes. The Subject field has a 160 character limit and is a required field. The Body field has a 1000 character limit.
- Click the Send button to send the messages. Employees who have opted in for SMS text notifications or enabled eHub Mobile push notifications will receive the message. Employees with no notification preferences set, will see the message from the message center in eHub Mobile.
Available filters
Note: The supervisor's employees returned are based on the employees primary jobs, the employees scheduled jobs, and borrowed employees based on their scheduled jobs. The employees scheduled for that job display within a range of three days before and three days after the current date.
After you select a filter, enter a value in the field next to the filter to narrow the results. Click the button to display the results for the PS Job filter. The employee number and name display by default.

Note: Templates are per user. You can only use and view the templates you have created.
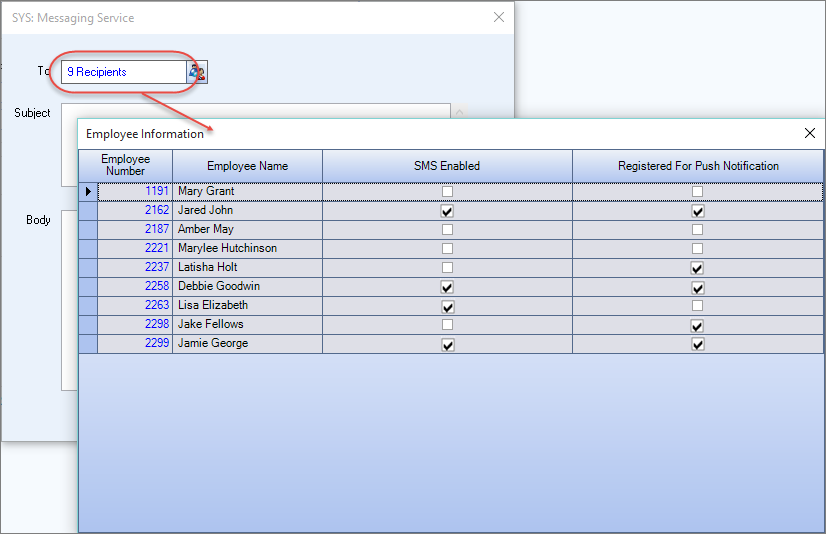
Note: This list has grid functionality and can be exported. If there are employees who are not receiving SMS text messages and push notifications you may need to get a message to them using another method.
Important: We recommend you limit your message text to fit into the Subject field, as notifications and SMS text messages do not display the body text. The message body text only displays in the eHub Mobile application.
How to view message history
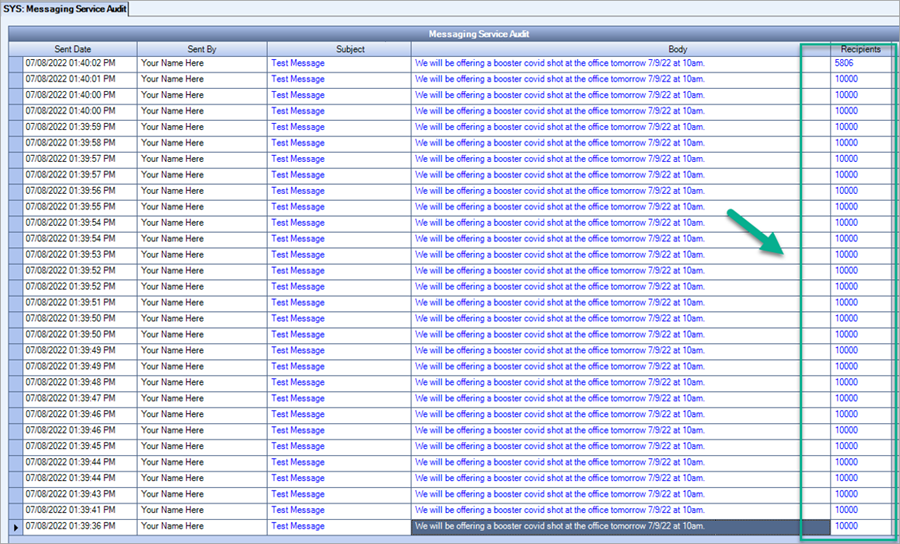
- In the System module, open the Messaging Service Audit window (in the Tools group). This window displays a history of sent messages listed by the Sent Date. This is a read-only window.
- To view message details, double click the Subject, Body, Recipient values and/or the camera icon.
- When you double click on the camera icon to view the images that were sent, use the left and right buttons to see all of the images that were sent with the message. Images are read-only and can not be edited or deleted from the audit window.

Note:When you send a message to more than ten thousand employees, the service sends the message to employees in batches of ten thousand.
Security
The security permission for this window is called SYS Messaging Service Audit. This security permission is included in the SYS All security group in SYS: User Security.
All employees with an eHub supervisor license have access to the messaging feature. This feature is available for iOS and Android devices.
How to send messages
eHub supervisors can send messages to their employees, using eHub Mobile. Messages are sent from the main landing screen, employee landing screen, job landing screen and the my eHub screen.
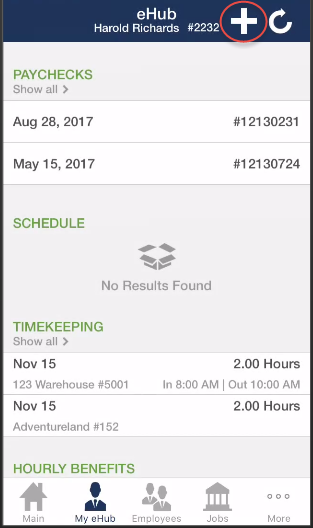
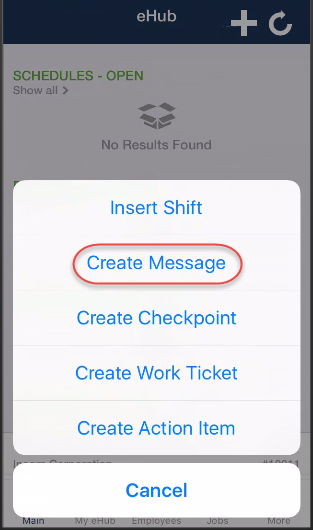
- From the main landing page, tap the plus sign in the top right corner of the screen.
- Tap Create Message from the list of options.
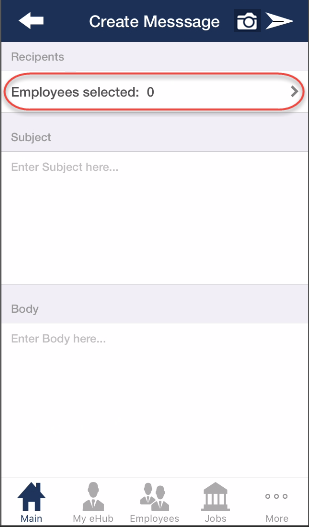
- Tap in the Recipients field to display the list of employees. This list displays employees you supervise and employees that work at jobs you supervise.
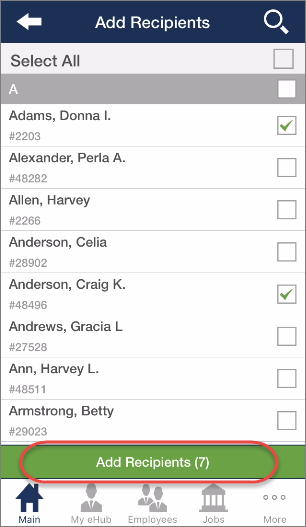
- Select the employees you want to send the message to. You can use the Select All at the top of the list to send the message to all of your employees, or check the appropriate employees individually.
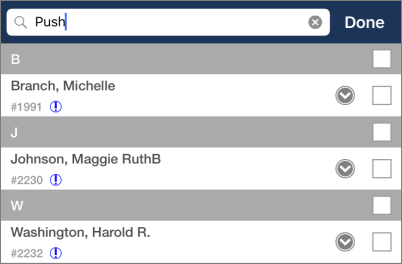
- The icon of a blue exclamation point inside a blue circle that displays to the right of the employee’s ID number indicates the employee has opted in to receive either push or SMS notifications. You can hover on this icon to view a tool tip that contains the employee’s notification information. You can click this icon to expand the rows under the employee’s name that contain the details about each notification type. An employee could be receiving one or both of the notification types.
- You can use the search field above the recipients list to locate all employees receiving notifications. Enter either “Push” or “SMS” to locate all employees receiving each notification type. The entries you make in the search field are not case sensitive
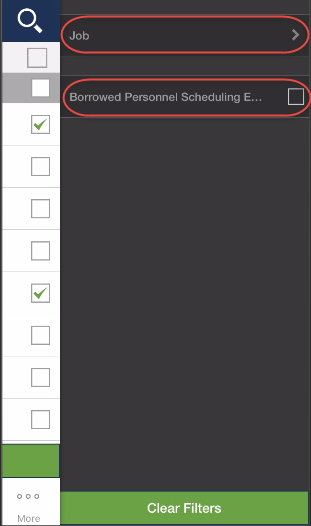
- To filter, swipe to the left to display filtering. With the filter you can select to include borrowed employees from Personnel Scheduling, or tap on the job arrow to filter by job.
- Once you have the appropriate employees selected, tap the Add Recipients button at the bottom of the screen.
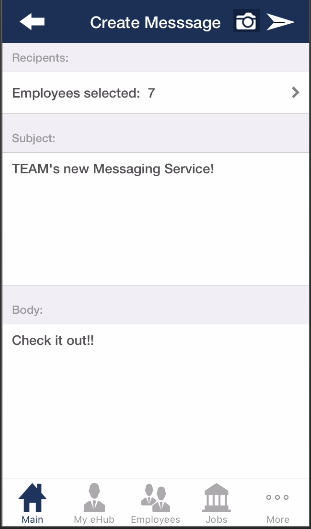
- Enter the Subject and Body of your message. The Subject field has a 160 character limit and is a required field. The Body field has a 1000 character limit.
Optional - attach up to five images to your message. Click on the camera icon and choose either the Take Photo option or the Choose Existing option.
- To send your message, tap the send icon in the top right of the create message screen.



Important: We recommend you limit your message text to fit into the Subject field, as notifications and SMS text messages do not display the body text. The body text only displays in the message on the eHub Mobile application.

Messages can also be sent from the employee, job and my eHub landing pages. Sending from the employee page, automatically includes the employee you are viewing, and sending from the job page, automatically includes the employees with the selected job as their primary job. You can add or remove employees from the recipient list by tapping on the selected employees.
How to view messages
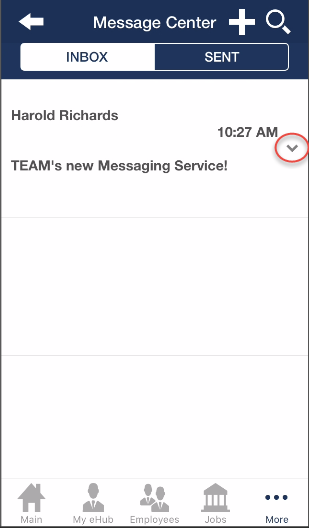
- To view your new messages, tap the More option, then select Message Center. If you have new messages a badge displays with the number of new messages.
- Tap the arrow to the right of the message to expand and view the message body text. Unread messages display in bold text.

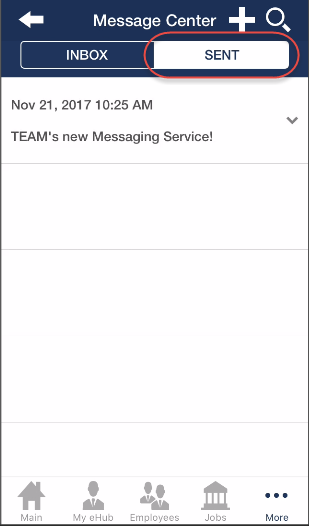
To view your previously sent messages, tap the Sent option from the Messaging Center.
To view the message recipient list, long press the message. Also, you can long press the recipient list to see if the message has been read. If the employee has read the message a read icon displays, and the employees who have not read the message display in bold text.
How to send messages
eHub supervisors can send messages to their employees, using eHub Mobile. Messages are sent from the main landing screen, employee landing screen, job landing screen and the my eHub screen.
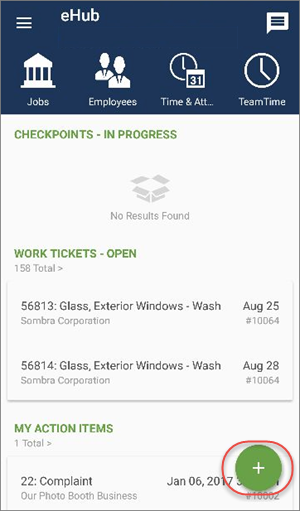
- From the main landing page, tap the plus sign in the bottom right corner of the screen.
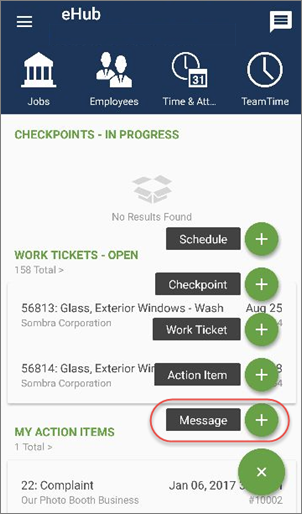
- Tap Message from the list of options.
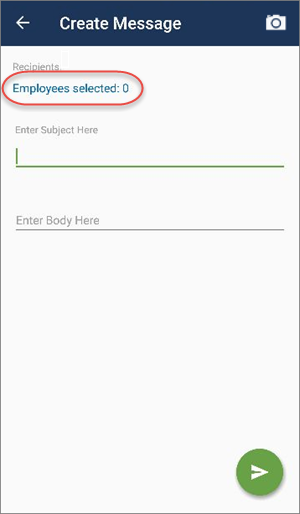
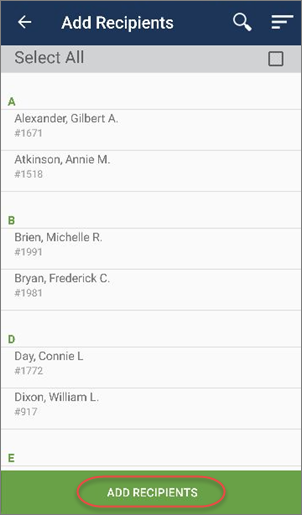
- Tap in the Recipients field to display the list of employees. This list displays employees you supervise and employees that work at jobs you supervise.
- Select the employees you want to send the message to. You can use the Select All at the top of the list to send the message to all of your employees, or check the appropriate employees individually.
- The icon of a blue exclamation point inside a blue circle that displays to the right of the employee’s ID number indicates the employee has opted in to receive either push or SMS notifications. You can hover on this icon to view a tool tip that contains the employee’s notification information. You can click this icon to expand the rows under the employee’s name that contain the details about each notification type. An employee could be receiving one or both of the notification types.
- You can use the search field above the recipients list to locate all employees receiving notifications. Enter either “Push” or “SMS” to locate all employees receiving each notification type. The entries you make in the search field are not case sensitive
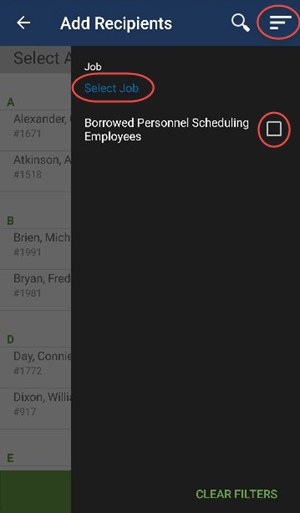
- Tap the filter icon to display the filter options. With the filter you can select to include borrowed employees from Personnel Scheduling, or tap on Select Job to filter by job.
- Once you have the appropriate employees selected, tap the Add Recipients button at the bottom of the screen.
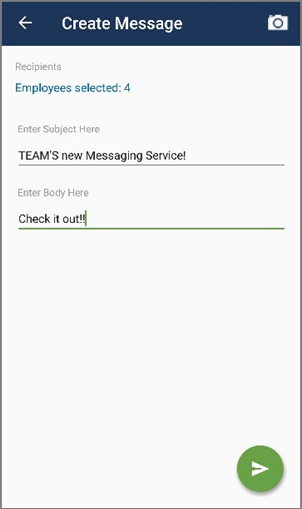
- Enter the Subject and Body of your message. The Subject field has a 160 character limit and is a required field. The Body field has a 1000 character limit.
- Optional - attach up to five images to your message. Click on the camera icon and choose either the Take Photo option or the Choose Existing option.
- To send your message, tap the send icon in the bottom right of the create message screen.


Important: We recommend you limit your message text to fit into the Subject field, as notifications and SMS text messages do not display the body text. The body text only displays in the message on the eHub Mobile application.

Messages can also be sent from the employee, job and my eHub landing pages. Sending from the employee page, automatically includes the employee you are viewing, and sending from the job page, automatically includes the employees with the selected job as their primary job. You can add or remove employees from the recipient list by tapping on the selected employees.
How to view messages
- To view your messages, tap the message center icon on the main landing page. If you have new messages a number displays to indicate the number of new messages.
- Tap the arrow on the right of the message to expand and view the body text. Unread messages display in bold text.


To view your previously sent messages, tap the Sent option from the Messaging Center.

To view the recipient list for the message, long press the message. Also, you can long press the recipient list to see if the message has been read. If the employee has read the message a read icon displays, and the employees who have not read the message display in bold text.
Note: Employees that have not opted into SMS text messages, or have disabled the push notifications for eHub Mobile, will still see the messages through the eHub Mobile application. The badge displaying the number of new messages, will be an indication that the employee has a new message to view.
Related Information
For more details on eHub notifications and who receives them, see this link.
For additional information on enabling an employee to receive SMS text messages and to turn on eHub Mobile push notifications, see this link.


