PAY: Replacing a Check
Overview
This article contains information about the steps to take after a payroll batch has been printed and the NACHA file was sent to the bank and the employee’s routing number or account number was incorrect or did not exist. This process also applies to incorrectly printed paychecks.
Before replacing a check , the original check must have been printed, updated to the General Ledger, still be outstanding, and not previously voided or replaced by another check. Replacement checks are created one at a time.
When a check is printed, the direct deposit information from the Employee Master File (EMF) is saved with the check. If this information is incorrect, it cannot be edited at the check level.
If ADP is used, see Replacing a Check when Using ADP for additional information.
Process to Replace a Check:
- If replacing a direct deposit check, enter the correct direct deposit information in the EMF.
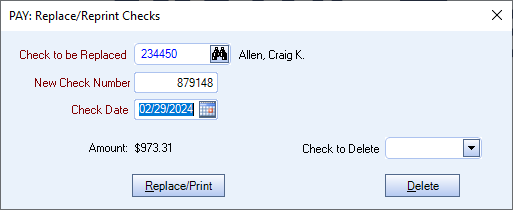
- Create a replacement check using PAY: Replace/Reprint Checks. The payroll batch must be updated to the General Ledger (GL). The original check is marked Replaced when a second check is created. The first check contains the wage and tax information. The second check does not post to the GL and does not affect the employee’s W-2 wages and taxes.
- Process the second check in PAY Print Checks. The corrected direct deposit information from the EMF is used.
- Include the replacement check in the NACHA bank file if the check was direct deposit.
- Both the original check with the incorrect information is retained for reference (but marked as replaced) and the second check with the correct information.
Replace/Reprint Checks Window
Replace a Check
- Open the Replace/Reprint Checks window from the Payroll module main menu or from the Review Checks window.
- Select the check number to be replaced, or use the Lookup to locate the check number. If the check number exists for more than one Cash Account, a list displays where the correct check can be selected.
- The new check number is populated with an auto increment from SYS Cash Accounts Setup. It can be changed to any check number not already used in the GL Cash account.
- Enter the date of the new check.
- Click Replace/Reprint


Delete a Replacement Check
- Select the existing check to delete.
- Click Delete.

