
Process Overview
TEAM offers its clients Employee 1095-C form printing and home address mailing services. The process requires a few simple steps:
- Generate Employee 1095-C forms in WinTeam Insurance Benefits module
- Save the 1095-C output to a PDF file
- Submit the PDF file via a secure location
- Receive verification that printing and mailing is complete
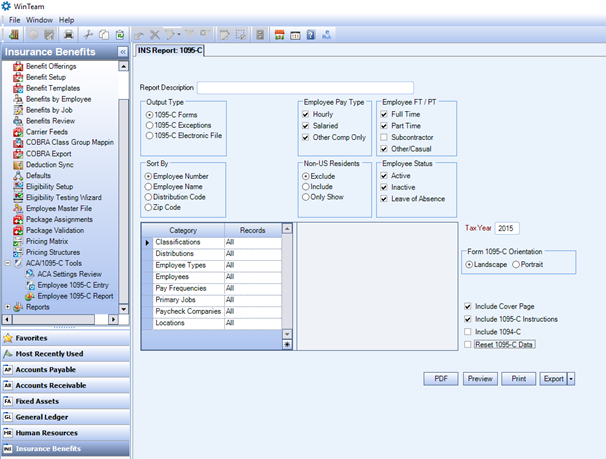
Step 1 – Generate Employee 1095-C forms
On the INS: 1095-C report options screen:
- Select the Output Type 1095-C Forms
- For the Tax Year, enter the appropriate tax year (yyyy).
- For Form 1095-C Orientation, select Landscape
- Select the Include Cover Page and Include 1095-C Instructions check boxes
- Click the PDF button
The file may take several moments to process. You can see the progress at the bottom left of the screen.
Once the PDF is processed, the system displays a message. Click the Yes button.
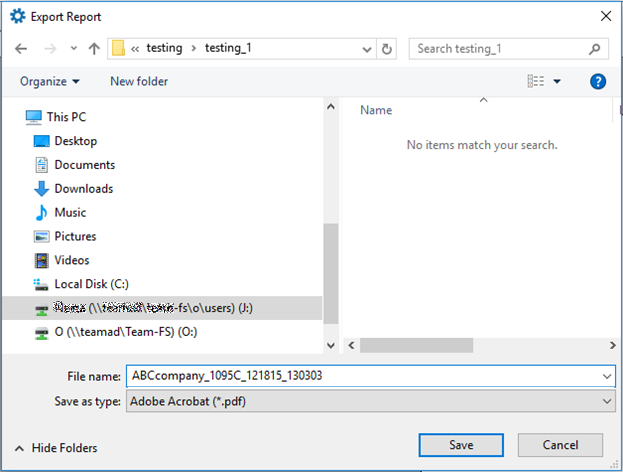
Step 2 – Save the 1095-C output to a PDF file
- At the top left of the page, click the Export Report icon.
- Browse to the location to which you want to save the PDF file. Change the Save as type drop-down to Adobe Acrobat (*.pdf) and save the PDF file with correct naming convention:
- The system displays a message when the PDF file has been saved successfully. Please review the file to ensure all employees that need to receive a Form 1095-C are included. If any record requires corrected, make changes and re-run the PDF file. Verify that changes you made have been applied.
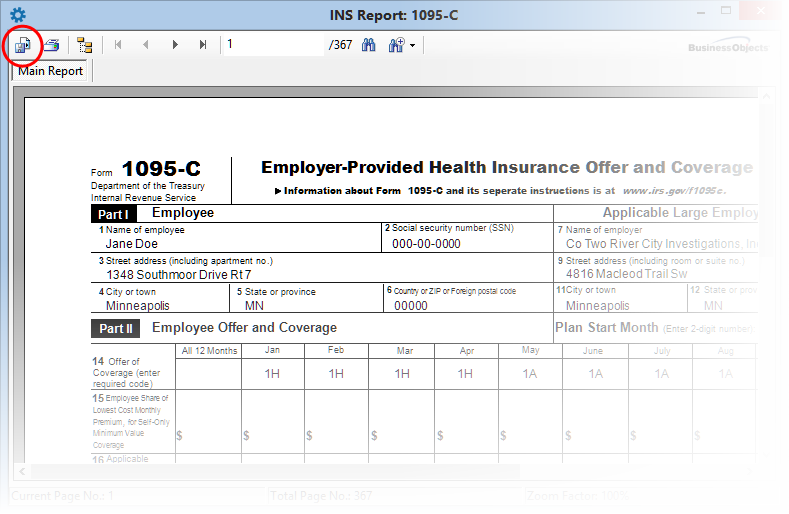
Example: For employees with less than six dependents, the 1095-C form will print on two pages of paper. You will see four pages when viewing in WinTeam PDF file/Report viewer: Page 1 displays Mailing and From Addresses; Page 2 is blank; Page 3 displays the main 1095-C page; Page 4 displays the 1095-C Instructions page. If an employee has seven or more dependents, the 1095-C will print on three physical pages (six pages when viewing in WinTeam PDF file/Report Viewer.).
Step 3 – Submit the PDF file via a secure location
In order to submit the PDF file to a secure location, you will need:
3.1 Information to submit the PDF file
3.2 SFTP application installed on a computer
3.3 Notify TEAM Customer Services (April)
Step 3.1
If your company has a TEAM SFTP site, you can skip to Step 3.2.
If you do not have a TEAM SFTP site, contact TEAM Client Services via email at supportstaff@teamsoftware.com with the Subject line: ATTN: April: 1095C Processing / File Transfers – YourCompanyName, or call (402-345-5660) to obtain the credentials assigned to your company necessary to submit the PDF file to the secure location for print and mail processing.
Step 3.2
Once you have this Information, you will need an SFTP application to submit the PDF file to a secure SFTP location. An example of an SFTP application is FileZilla, which can be searched on any web browser and downloaded.
Once you have the SFTP application installed, you will see a screen similar to this one when you open it.
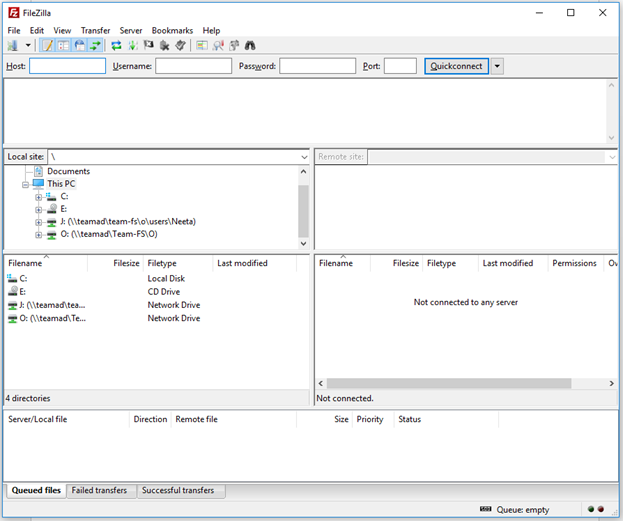
Use the credentials obtained in Step 3.1 to transfer your file. Enter the Host, Username, Password and Port information in the appropriate sections in the SFTP application, and connect. Browse to the location listed for your company and submit your PDF file.
Step 3.3
Notify TEAM Client Services via email at supportstaff@teamsoftware.com that the file has been submitted to the SFTP site. Use the Subject line: ATTN: April: 1095C Processing / File Transfers – YourCompanyName.
Within two business days from receipt of the file, 1095-C print and mail processing to all employees listed in the PDF file will be completed.
Step 4 –Receive verification that printing and mailing is complete
Once printing and mailing is complete, you will be notified by a TEAM customer services representative.