Overview
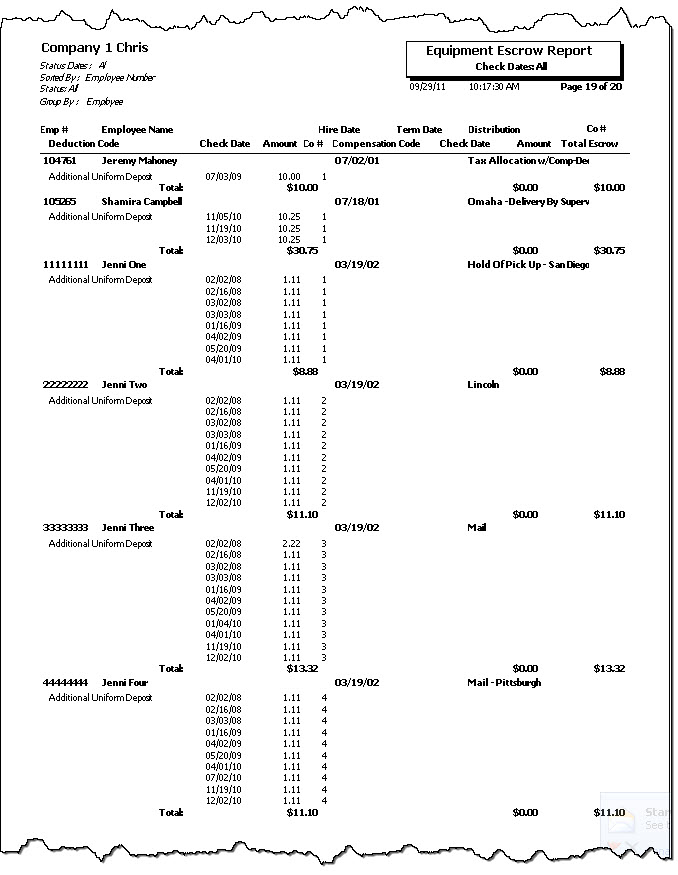
The Equipment Escrow report shows all of the deduction and refund activity by employee for all other compensation codes and other deduction codes that are set up to be included in the Equipment Tracker Escrow. The total Escrow amounts are computed by subtracting the escrow refunds from the escrow deductions. This total escrow amount is the amount still being held by your company for equipment that has been issued to the employee.
Security
The HR Report Equipment Escrow screen has its own Security Group, HR Report Equipment Escrow.
The HR Report Equipment Escrow screen is part of the HR Reports All Employees Security Group.
Tip: For more information see Security Groups Overview and Security Groups By Module.
Only those records where the logged in user has a Paycheck Read Security level equal or greater than the employee security level are included.

Related Information
Key Functionality
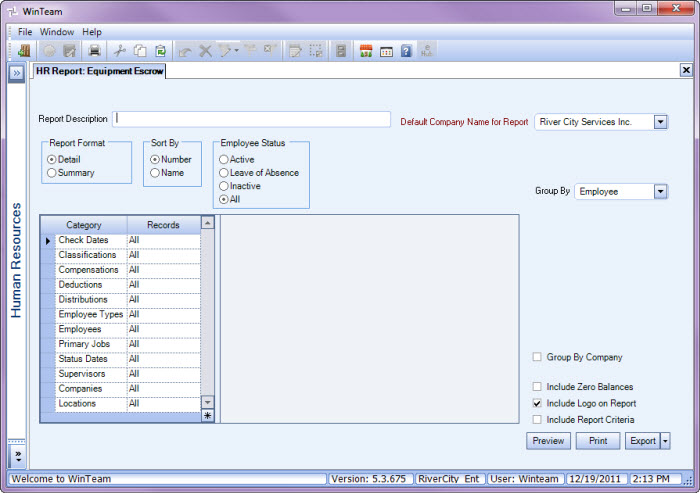
Type a description to name the report. This description prints above the Report Title.
Available for Clients using the Multi-Company feature. The Default Company Name for Report is populated from the Company Setup screen. The list contains all companies you have permission to access.
- If the User has permission to only one company, then just that one company will display in the list.
- If the User has permissions to more than one company, the list will contain all companies the User has rights to PLUS the default reporting company.
When the Group By Company option is selected, the default company prints on the Grand Total Page and the Report Criteria page. All other pages print the applicable company name. When the Group By Company option is NOT selected, the default company prints on every page of the report.
For more information see Learning about WinTeam Reports.
Use the Report Format option to choose the level of detail for the report.
Use the Sort By option to sort report data by Number or Name.
Click Number to sort report data by Employee Number or Job Number (depending on the report).
Click Name to sort report data by Employee Name or Job Name (depending on the report). If there are employees with the same last name, they are first sorted by last name and then by first name.
Use the Employees Status option to filter the report data by employee status.
- Select Active to include only active employees.
- Select Leave of Absence to include only employees who are on leave of absence. If this options is selected, you may group the report by Inactive Reason.
- Select Inactive to include only inactive employees.
- Select All to include all employees, regardless of their status.
Group By
You can choose to Group the Report Criteria by Employee, Classification, Distribution, Employee Type, Primary Job, or Supervisor.
The default selection is Employee.
Category/Records
Check Dates
Select the Check Dates to include.
Select All to include all Check Dates.
Select Date Range to define a range of Check Dates to include. When you select Date Range, the range fields display. Type the beginning Check Date in the From field and the ending Check Date in the To field.
Classifications
Use the Classifications category to select the Classifications to include on the report.
Select All to include all Classifications.
Select Pick to define specific Classifications for the report. When you select Pick, the Classifications list displays. Select the check box next to each Classification to include on the report.
Compensations
Use the Compensations category to select the Compensation Codes to include on the report.
Select All to include all Compensations.
Select Pick to define specific Compensations Codes for the report. When you select Pick From List, the Compensation Codes list displays. Select the check box next to each Compensation Code to include on the report.
Select None to exclude Compensations.
Deductions
Use the Deductions category to select the Deduction Codes to include on the report.
Select All to include all Deduction Codes.
Select Pick to define specific Deduction Codes for the report. When you select Pick From List, the Deduction Codes list displays. Select the check box next to each Deduction Code to include on the report.
Select None to exclude Deductions.
Distributions
Use the Distributions category to select the Distribution to include.
Select All to include all Distribution types.
Select Pick to define specific Distribution to include. When you select Pick, the Check Distributions add edit list displays. Select the check box next to each Check Distribution to include.
Employee Types
Use the Employee Types category to select the Employee Types to include.
Select All to include all Employee Types.
Select Pick to define specific Employee Types. When you select Pick, the Employee Types list displays. Select the check box next to each Employee Type to include.
Employees
Use the Employees category to select the Employees to include on the report.
Select All to include all Employees on the report.
Select Range to define a range of Employees for the report. Type the beginning Employee Number in the From field and the ending Employee Number in the To field.
Select Create to define your own list of Employees. When you select Create, a small grid displays to the right. Enter the Employee Numbers you want to include in the list, or use the Lookup to locate the Employee Numbers.
Select Exclude to identify records that should not be included. When you select Exclude, a small grid displays to the right. Enter the Employee Numbers you want to exclude in the list, or use the Lookup to locate the Employee Numbers.
Primary Jobs
Use Primary Jobs to filter the report by Primary Jobs.
Select All to include all Primary Jobs.
Select Range to define a range of Primary Jobs for the report. When you select Range, the range fields display. Type the beginning Primary Job Number in the From field and the ending Primary Job Number in the To field.
Select Pick to select the Primary Job(s) to include.
Select Create to define your own list of records. When you select Create, a small grid displays to the right. Enter the records you want to include in the list, or use the Lookup to locate the records.
Select Exclude to identify records that should not be included. When you select Exclude, a small grid displays to the right. Enter the records you want to exclude in the list, or use the Lookup to locate the records.
Status Dates
Use the Status Dates category to select the dates to include on the report. This allows you to select employees based on dates relative to their employee status at that time.
Select All to include all Status Dates.
Select Date Range to define a range of Status Dates for the report. When you select Date Range, the range fields display. Type the beginning date in the From field and the ending date in the To field.
Supervisors
Use the Supervisors category to filter the report by Supervisors.
Select All to include all Supervisors.
Select Pick to select the Supervisor(s) to include.
Companies
The Company Pick option filters for AR Invoice and Payment records. The Companies category is available for Clients using the Multi-Company feature.
Select the Companies to include on the report.
Select All to include all companies on the report.
Select Pick to define specific Companies for the report. When you select Pick, the Companies list displays. Select the check box next to each Company to include on the report.
Note: When running reports using the Company Category/Record Pick and the company name exceeds the maximum number of characters, WinTeam will truncate the name.
Locations
The Locations category is available for Clients using the Multi-Location feature.
Use the Locations category to select the Locations to include on the report.
Select All to include all Locations on the report.
Select Pick to define specific Locations for the report. When you select Pick, the Locations list displays. Select the check box next to each Location to include on the report.
This option is available to users who have more than one company, but is not selected by default. If selected, the default company prints on the Grand Total Page and the Report Criteria page. All other pages print the applicable company name. If not selected, the default company prints on every page of the report.
Include Zero Balances
Select the Include Zero Balances check box to print all line items that have a zero balance for each Employee on the report.
Select this check box to print the company logo on the report. It is selected or cleared by default based on the option selected in SYS:Defaults. However, you can modify the setting on each report.
Select this check box to include a list of the report options selected for the report. The Report Criteria page includes any ranges specified and each Category/Record selection made for the report. This check box is cleared selected by default.
Preview
Click the Preview button (or use the shortcut key, ALT + V) to view the report before printing.
Click the Print button (or press ALT + P) to send the report to your default printer.
Export
Click the Export button (or press ALT + X) to export the report to a specified format. Reports may be exported to Adobe Acrobat (PDF), Excel, Comma-Separated Values (CSV), Grid View and E-mail (available for premise-based clients only).


