Overview
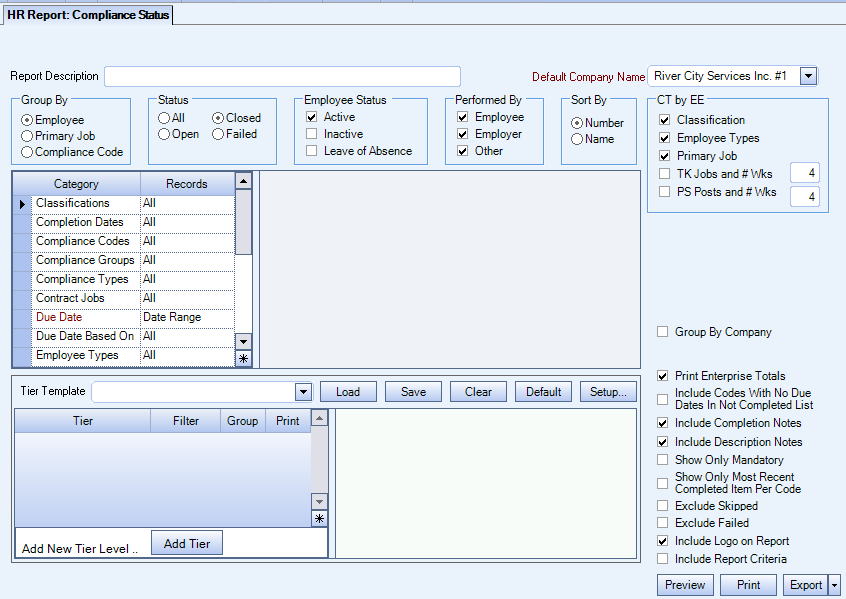
Use the Compliance Status report to print compliance status information. The Compliance Status Report looks at all Compliance Codes (including License/Expiration Codes) and can calculate what is due based on the Employee's Classification, Employee Type, Primary Job, and where they are actively working.
You may group this report by Employee, Primary Job, or Compliance Code.
You may filter the by report Hire Dates, Classifications, Employee Types, Supervisors, Employees, Locations, or Companies (if applicable).
The report criteria can be based on Due Date Based On, Compliance Codes, Compliance Types, Due Dates, Completion Dates, and Performed by Other.
To include codes with no due dates select the Include Codes with no Due Dates in Not Completed list check box.
You can use the Tier Pattern Template to select Primary Jobs that are within a tier selection.
You can filter, group, and print by Tiers, allowing for total customization of the report. To make filtering easier, for any Tier, you can include All, Pick/Create or Exclude parameters. Using Tier Templates to set up and save report templates makes it easy to generate a specific report each time you need it, without having to recreate the criteria. See Using Tier Templates for more information.

Security
The HR Report Compliance Status screen has its own Security Group, HR Report Compliance Status.
The HR Report Compliance Status screen is part of the HR Reports All Employees Security Group.
Tip: For more information see Security Groups Overview and Security Groups By Module.
Key Functionality
Type a description to name the report. This description prints above the Report Title.
The Default Company Name for Report is populated from the Company Setup screen. The list contains all companies for which you have security permissions to view. If you have permission for only one company, that will be the only one displayed in the list. If you have permissions to multiple companies, the list will display those companies PLUS the default reporting company.
When discernible, WinTeam will print the appropriate company name and logo on each page; otherwise the Default Company Name will print. That is, if a Company level is included in the tiered section and is displayed in the tiered information at the bottom of the page, then that company's Report Name and Logo (if selected) prints on that page.
If there is not a Company identified in the tier area of the page, then the Default Company Name for Reports is used. The default Company Name and Logo is also used for the Total Enterprise report. For more information see Learning about WinTeam Reports.
Group By
Use the Group By option to group the compliance items by Employee, Primary Job, or Compliance Code.
Status
Use the Status option to select the compliance status to include on the report.
- All–Compliance codes of every status are included in the report
- Open–Only compliance codes that are open are included in the report.
- Closed–Only compliance codes that are closed are included in the report.
- Failed–Only compliance codes that are in a failed status are included in the report.
Employee Status
Use the Employee Status check boxes to select the employees to include on the report.
- Select Active to include active employees on the report
- Select Inactive to include inactive employees on the report
- Select Leave of Absence to include employees who are on a leave of absence on the report
Performed By
Use the Performed By check boxes to select Compliance Codes to include on the report based on who in your company is responsible for performing and completing the Compliance Tracking Code tasks.
- Select Employee to include Compliance Codes to be completed by the employee
- Select Employer to include Compliance Codes to be completed by the employer
- Select Other to include Compliance Codes to be completed by someone other than an employee or employer on the report. If you select Other, the Performed by Other category displays in the Category/Record container enabling you to pick from the list of Others.
Sort By
If Grouping By Code, this Sort By is not applicable.
Use the Sort By option to sort report data by Number or Name.
- Click Number to sort report data by Employee Number or Job Number or Code (depending on the Type of Report; By Job or By Employee)
- Click Name to sort report data by Employee Name or Job Name (depending on the Type of Report; By Job or By Employee)
CT by EE (Compliance Tracking by Employee)
Multiple selections allow you to include Employees who belong to any one of the filters.
To make a subset, use the Classification and Employee Type Category/Records filter.
- Classification - This option is selected by default.
- Employee Types - This option is selected by default.
- Primary Job - This option is selected by default.
- TK Jobs and # Wks - This option defaults to 4 weeks. The # Wks x 7 days is used to calculate the number of days for the system to look back and find all Jobs that the employee worked at.
Today is 12/29/11 and we are using the default of 4 weeks.
4 weeks X 7 days = 28 days.
The system looks back 28 days, which is 12/01/11. So the system looks at ALL TIMEKEEPING RECORDS for the employee from 12/01/04 on forward (even into the future) to find all of the jobs they worked. It will then include the appropriate Job Requirements information.
- PS Posts and # Wks - This option defaults to 4 weeks. The # of Wks x 7 is used to calculate the number of days for the system to look back and find all Posts that the employee is scheduled to work.
Today is 12/29/11 and we are using the default of 4 weeks.
4 weeks X 7 days = 28 days.
WinTeam looks back 28 days, which is 12/01/11. So the system looks at ALL SCHEDULES including the MASTER schedules for the employee from 12/01/11 on forward (and even into the future -- including master schedules) to find all job/posts that they are scheduled for. It will then include all of the Post requirements.
Category/Records
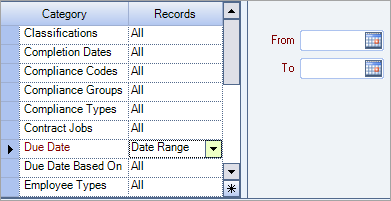
Select a category and then select either All to select everything in the category or Pick to filter information in the category. Due Date is the only required category filter–a date range must be entered. The Due Date calculation is:
- The original Due Date for Failed records.
- The Date Revoked for Revoked records.

Use the Tier Template to define and save customized settings for a report. To use an existing template, select the template from the list and click Load.
To create a new template, you can load an existing template, make the necessary modifications, click Save, and define a new template name in the Save As dialog box. Alternatively, you can start with a blank template by clicking the Clear button.
To modify an existing template, load the template, make the necessary modifications, and then click Save. The name of the existing template display in the Save As dialog box. Click OK.
For more information see Using Tier Templates and Using Tier Parameters.
Show Only Most Recent Completed Item Per Code
When reviewing Closed records, select this check box to only show the most recently completed item for each code.
Exclude Skipped
When reviewing Closed records, select this check box to exclude records with the Skipped code from the printed report.
Exclude Failed
When reviewing Closed records, select this check box to exclude records with the Failed code from the printed report.
Select this check box to print the company logo on the report. It is selected or cleared by default based on the option selected in SYS:Defaults. However, you can modify the setting on each report.
Select this check box to include a list of the report options selected for the report. The Report Criteria page includes any ranges specified and each Category/Record selection made for the report. This check box is cleared selected by default.
Preview
Click the Preview button (or use the shortcut key, ALT + V) to view the report before printing.
Click the Print button (or press ALT + P) to send the report to your default printer.
Export
Click the Export button (or press ALT + X) to export the report to a specified format. Reports may be exported to Adobe Acrobat (PDF), Excel, Comma-Separated Values (CSV), Grid View and E-mail (available for premise-based clients only).
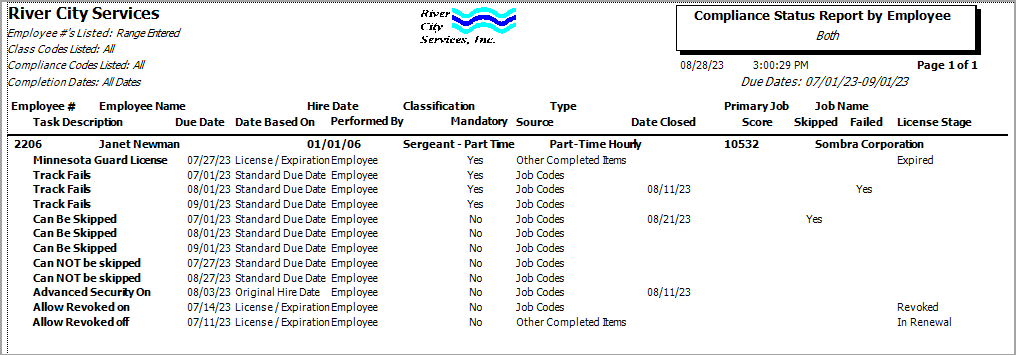
Report Sample

