Overview
Using the Workflow process to take care of Work Requests, Personnel Requests or Employee Information Change Requests generated in eHub. eHub can help you streamline your approval and notification process and create a smooth, seamless way to update information efficiently. The Workflow process you set up for each type of request can be as simple or robust as you choose in order to customize a process that fits your company's needs.
More details can be found in the following sections:
Workflow Frequently Asked Questions and Troubleshooting Tips
The Basics
While the Workflow process seems tricky at first, and maybe overwhelming, once you understand the basics, it can be an indispensable tool for automating your request processes.
The basic concept is simple:
- An eHub user submits a request.
- The request appears on the user's screens in eHub as "Pending".
- A notification indicating that the request has been submitted and that action needs to be taken on it (approve, deny, etc.) is e-mailed to the first Assignee in the Workflow process (a supervisor, manager, Human Resources personnel or similar).
- The request appears in the Assignee's screens as "Pending."
- The Assignee takes action on the request. Let's say the Assignee approves the request.
- The request now appears in the Assignee's screen as "Approved."
- Assuming there are two steps in the Workflow, the request is e-mailed to the second Assignee.
- The request appears in the second Assignee's screen as "Pending."
- The second Assignee approves the request.
- The request appears in the second Assignee's screen as "Approved."
- The request appears in the user's screen as "Approved."
- The request is now ready for import into WinTeam, if necessary.
For an overview of the Workflow Setup screen and its functions, please visit the SYS: Workflow Setup topic in the WinTeam help files.
For specific examples of how to set up various Workflows, see the following:
How Do I Set Up an Employee Information Change Request Workflow?
How Do I Set Up a Personnel Request Workflow?
How Do I Set Up a Customer or Employee Work Request Workflow?
Security
It is important to consider the Security Groups you will use for eHub. That is, what roles will customers, employees and supervisors have in eHub and which screens and features will be available to them. These feature sets must be defined before they can be assigned to employees and customers.
The following screens and features should be assigned to customers, employees and supervisors/administrators in order for the request creation and workflow processes to fully function. All screens and features are subject to your discretion and can be assigned based on how little or how much you want to give your customers and employees.
Tip: Check Security Groups, Screens and Features if a Workflow is not functioning properly or if a customer or employee is unable to submit requests.
- Customers
- Create Personnel Requests
- Create Work Requests
- My Requests
- Personnel Requests
- Supervisors/eHub Administrators
- Create Personnel Requests
- Create Work Requests
- Employee Profiles
- Features
- View Address Information
- Change Address Information
- View Contact Information
- Change Contact Information
- View Pay Rate
- Change Pay Rate
- View Primary Job
- Change Primary Job
- View Status
- Change Status
- Features
- My Profile
- Features
- Change Address Information
- Change Contact Information
- Features
- My Requests
- Personnel Requests
- Basic Employees
- My Profile
- Features
- Change Address Information
- Change Contact Information
- Features
- My Profile
Roles and corresponding screen and feature sets are set up in the eHub tab of the Security Groups screen in the System module of WinTeam. Visit SYS: Security Groups in the WinTeam help files for more information.
Notification
One of the main purposes for using the Workflow process is to notify the appropriate individuals or groups that a request has been submitted and requires action or review. To make sure you have completed the appropriate steps to notify the correct people, keep in mind the following areas:
Admin E-mail Address
Entering an e-mail address in the Admin E-mail Address field in eHub Setup (Workflow) tab ensures that someone will be notified if a request fails for any reason. If this field is left blank and a request fails due to a faulty workflow or incorrect e-mail address, you will not be notified which delays response time for your customers or employees.

Timeout Information
Under Timeout Information in the Workflow Setup screen, you can specify an Employee, E-mail Group and/or general E-mail Address (for a department, for instance) when a request times out. You can also choose to notify the originator of the request if it times out by selecting the Notify Originator on Total Expiration check box.
Double-click the E-mail Group field in order to display the SYS: E-mail Groups screen. Set up groups based on the Job Tiers set up in the JMF.

Note: The individuals or groups indicated here will be notified if no action has been taken on the request since initial submission and the Total Time Allowed passes. For instance, if Total Time Allowed is 48 hours, and 48 hours passes and the first step assignee has not taken action, the request will time out and notification will be sent to whomever is indicated.
This is not to be confused with the On Timeout information indicated in the Steps grid, which applies to individual steps rather than the whole request.E-mail Templates
Notifications can be as specific as you choose by assigning E-mail Templates in Workflow Setup. Going with a Simple template means that each assignee in the workflow will get the same e-mail. If you choose Advanced, you will need to set up and apply a template to each action or result in the process. Templates should be set up for each request type.

For a complete overview of setting up E-mail Templates, please see the E-mail Templates and Workflow Setup topics in the WinTeam help files.
CC: Originator on All Actions
Select this check box to CC the originator on all Actions taken on the request. You might want to use this for Customer Work Requests in order to keep the customer informed of the request's progress.
Steps/Assignees
Think through carefully how you want a request to proceed through the workflow and who should see a request for first approval through final approval. You'll also need to decide what happens when an Assignee approves or escalates a request or when a request times out between steps.
There is no limit to the number of steps you can create, but usually two or three is sufficient. In some cases, one step is enough. Creating steps and designating Assignees is not necessary for requests not requiring approval.
See the Workflow Setup topic in the WinTeam help files for details on setting up steps.
Default Workflows
Setting up Default Workflows is a necessary step in Workflow Setup and can save you valuable time by simplifying the workflow setup process.
In short, the system looks in three places in WinTeam in order to pick up the correct workflow for a request:
- Job Master File to see if a Default Workflow has been assigned to a request type there; if not then,
- eHub Setup (Workflow tab) to see if any Job Attributes (based on Tiers) have been applied to a specific request type in the Workflow Process Defaults section; if not then,
- the Default Workflow in Workflow Setup as a last resort
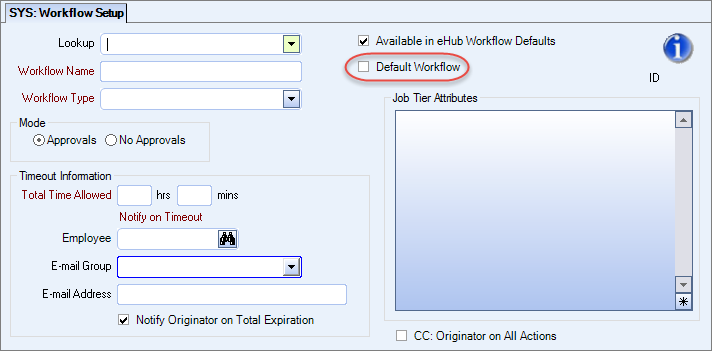
To designate a workflow as a Default Workflow, select the Default check box in the Workflow Setup screen. Only one Default Workflow per Workflow Type is allowed, and each Workflow Type (Work Request, Personnel Request, Address Request and so on) must have a Default designated.
Example: To simplify, you could set up a Default Workflow for each type of request (Work Request, Personnel Request, Address Request and so on), and generally this would be the workflow followed by most requests.
To customize a workflow based on a job, first set up an alternate workflow in Workflow Setup and make sure the Active check box is selected in order for the workflow to be accessible from the Job Master File. Then in the Job Master File assign the workflow to the request type there.
To customize a workflow based on a Job Attribute (based on Tiers set up in the JMF), first select a Tier to apply to a request type in the eHub Setup screen (Workflow tab). Then, set up an alternate workflow in Workflow Setup and select which Attribute of the Tier to apply to the workflow.
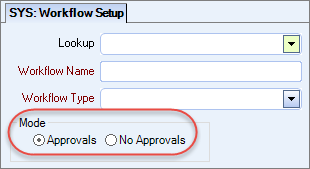
Approval Mode
Employee Information Change and Personnel Requests do not necessarily need to go through an approval workflow process, depending on how you want to monitor your requests.
Change requests for address, phone, e-mail, pay rate, primary job and status as well as Personnel Requests can be set up to require No Approvals upon submission using the Mode function in Workflow Setup in WinTeam. These requests will appear as "Received" in the eHub screens because no action needs to be taken on them.
Note: The Mode function is not available for Work Requests.
Example: You could set up alternate workflows for requests based on Job or Job Attributes in order to customize the automatic approval mode in case you want certain Employee Information Change or Personnel Requests to be automatically approved, but not others. In addition, since all Employee Information Change Requests have separate workflows, you could choose to have Employee Address and Phone/E-mail Change Requests be approved automatically, but require approval for requests to change an employee's pay rate, primary job or status.
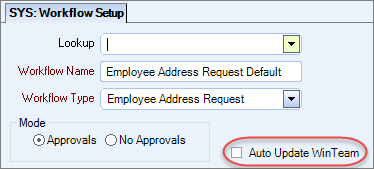
Auto Update WinTeam
In addition to skipping the approval process, some Employee Information Change Requests can, upon submission, be automatically updated in the Employee Master File in WinTeam by selecting the Auto Update WinTeam check box. With the Auto Update WinTeam check box selected in Workflow Setup, these requests will not require an import into the Employee Master File.
Note: This option is available only for employee address and phone/e-mail changes.
Using both the No Approvals and Auto Update WinTeam options means that an employee could submit a request to change an address, phone or e-mail in eHub and the changed information would be automatically approved and updated in WinTeam seamlessly with no action necessary from anyone.
The Auto Update option can be used in conjunction with the Approvals Mode as well, which would update the information automatically after the final approval in the workflow has been given.
Workflow Frequently Asked Questions and Troubleshooting Tips:
Each Workflow is assigned an ID, visible in Workflow Setup near the Change Info Icon. Those IDs are stored in the SS_Requests table in the Workflow ID column. Check there to determine which Workflow your request is picking up.

If the column contains a NULL value, no Workflow was picked up for some reason. In this case an e-mail indicating the failure is sent to the address indicated in the Workflow Admin e-mail field in the eHub Setup screen (Workflow tab). If no e-mail is entered there, you may not realize the request has failed. This is why entering an e-mail in this field is so important.
Let's say you wanted a Customer Work Request to follow the Default Workflow process, but it didn't and the request went to the wrong person. First, check the Job Master File to see if a Workflow has been assigned to the request type in the Job Requirements tab. If not, check to see if any Job Attributes have been applied to the request type in the eHub Setup screen (Workflow tab). If not, then double-check the Default Workflow process for that request type in the Workflow Setup screen to determine the Assignees are correct. You can also check the SS_Requests table to determine which Workflow the request is picking up.
One reason could be that no e-mail has been entered in the Employee Master File of an Assignee in the Workflow or the e-mail is invalid. Double-check spelling and domain. If the request is timing out, make sure any e-mail addresses or groups in the Timeout Information box in Workflow Setup are valid and/or have been assigned in the EMF.
The request could be failing or timing out for other reasons and you may not have been notified because you have not entered a Workflow Admin e-mail in the eHub Setup screen (Workflow tab).
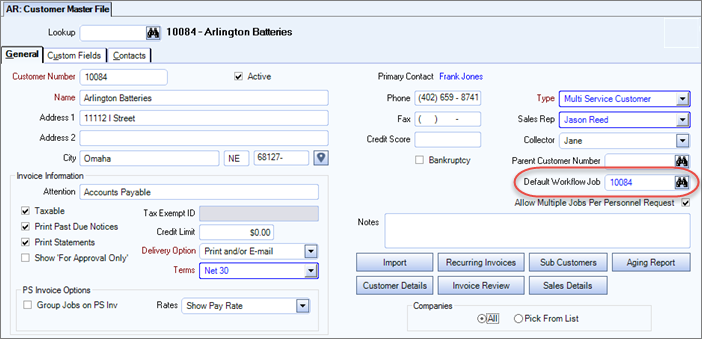
The Personnel Request with New Job will follow the Default Workflow for Personnel Requests, unless one of the assignees is set to Job Supervisor. In this case, since the New Job has no supervisor, the request would follow the workflow of the Job indicated in the Default Workflow Job field in the Customer Master File.